Once you have created a Form, if you want to share the Form as a Job Builder (to create New Projects), you need to Enable & Configure the Job Builder Settings in the ‘Access Rules‘ page for the Form.
Form “Access Rules”
The settings for Job Builder are in the ‘Access Rules‘ area of the Form.
To update the Job Builder settings:
- Go to the list of ‘Form Types’
- Click ‘Access Rules’ on the Form you wish to configure
- The ‘Access Rules’ page will load, with the various options for sharing the form.
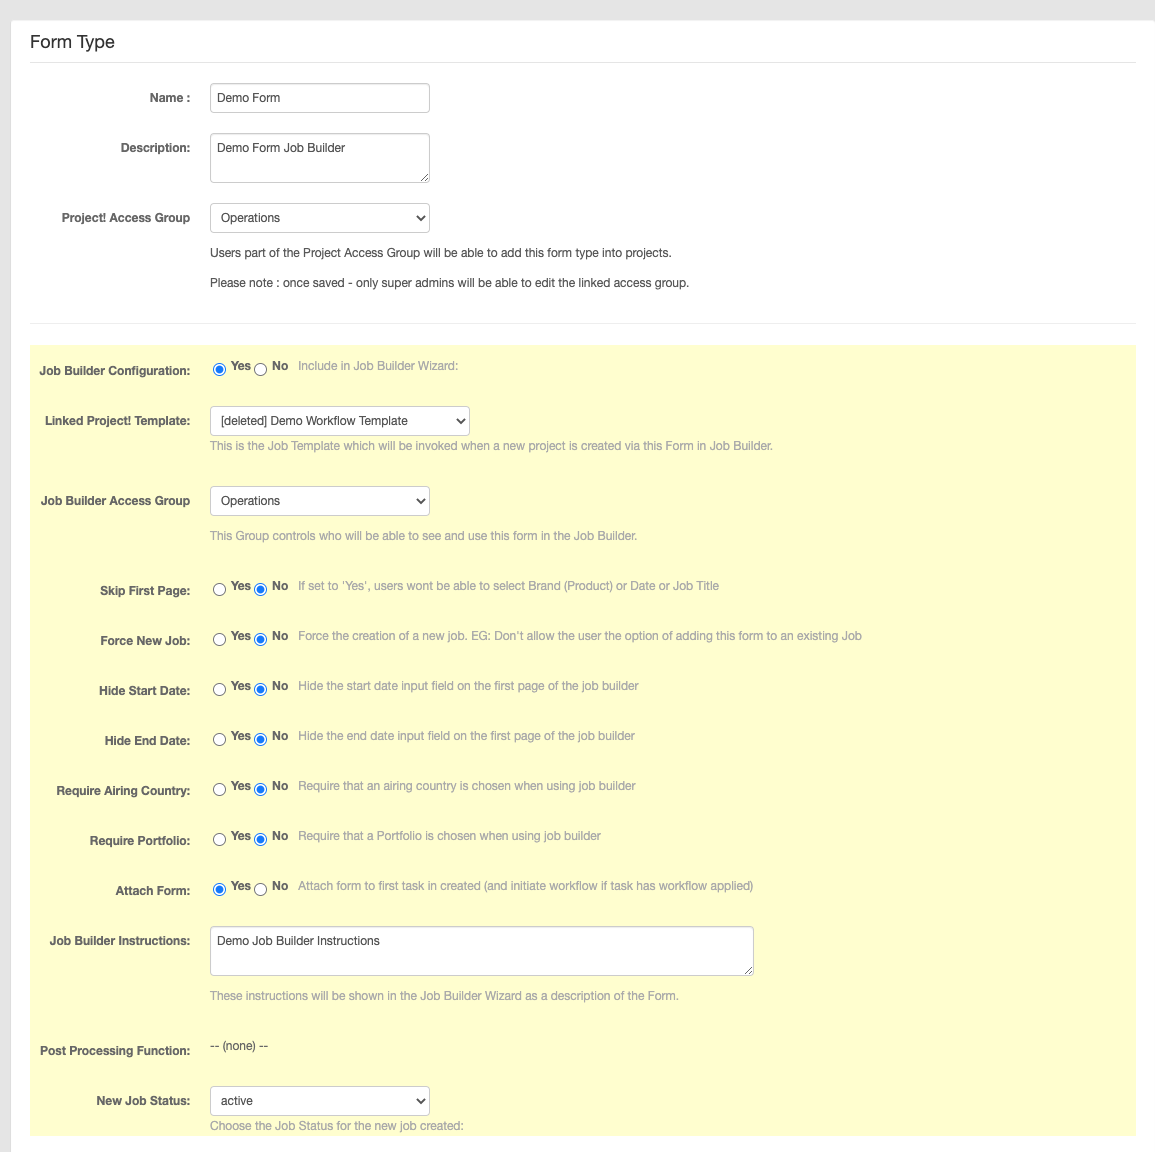
- Choose “Job Builder Configuration” set to “Yes”
- This will enable the options for Job Builder on this Form.

‘Job Builder Configuration‘ = ‘Yes‘
When you enable ‘Job Builder Configuration‘ as ‘Yes‘, you are effectively converting the simple Form into a ‘Job Builder‘.
This means that the Form will:
- Be shown as a ‘Job Builder’ button on the Homepage Dashboard for any User who has access to the Job Builder form
- Will be capable of creating New Projects, based on the settings defined for the form.
Job Builder Settings
There are many settings available in the Job Builder. Read below for information on the main settings required to enable the Job Builder for Users, and the Additional Configuration options to customise the behaviour of the Job Builder.
Settings to Enable & Share Job Builder
1) Linked Project Template
This is the Project Template that will be selected automatically when a Project is created from this Job Builder Form.
This can be left empty if you do not need to create Tasks or Folders from a Project Template when creating Projects from this form.
2) Job Builder Access Group
This is the User Group that will have access to use this Job Builder to create New Projects.
If a User is in this group, they will see the ‘Job Builder’ option on their Homepage Dashboard. If they click this button, they will see this Form as an option to use.
Additional Job Builder Settings
1) Skip First Page: Yes / No
If set to ‘Yes’, users wont be able to select Brand (Product) or Date or Job Title. Instead, the User will be directed to the first question in the form.
If you select this option, you should include the following fields in your Form:
– Brand selector
– Job Title field
Otherwise the Project will use the Job Number as the Project Title when creating the Project – and will default to the first Brand that the User has access to.
2) Force New Job: Yes / No
If set to ‘Yes’, the User will not get the option to choose an existing Project when submitting this Form.
If set to ‘No’, the User will be given an option to choose an Existing Project when submitting this Form. If an existing Project is selected, then the answers in the Form will be saved into the Existing Project as a ‘Form’ and a PDF (Instead fo creating a New Project).
If a Project Template is selected for the Job Builder – and the Form is submitted into an Existing Project – and Tasks, Files or Folders will be added to the Existing Project.
3) Hide Start Date: Yes / No
Hide the start date input field on the first page of the job builder.
If this option is selected, the Start Date will default to the day that the Job Builder Form is submitted.
Note: This date can be reviewed and updated by the Project Manager who receives the new Project notification.
4) Hide End Date: Yes / No
Hide the end date input field on the first page of the job builder
If this option is selected, the End Date will default to blank.
Note: This date can be reviewed and updated by the Project Manager who receives the new Project notification.
5) Require Airing Country: Yes / No
Require that an airing country is chosen when submitting the Job Builder Form.
6) Require Portfolio (Campaign): Yes / No
Require that a Portfolio (Campaign) is chosen when submitting the Job Builder Form.
7) Attach Form: Yes / No
If this option is selected, a PDF copy of the Form submitted by the user (with the answers to the questions in the Form) will be saved as an attachment against the first Task created in the Project, from the selected Project Template.
If there is a Document Workflow applied to the Task, the workflow will be initiated and the Task assigned to the correct user.
This is the correct approach to use if you need to notify the Project Manager of the Project – and have them review Briefing form. (Accept/Reject)
8) Job Builder Instructions:
These instructions will be shown in the Job Builder Wizard as a description of the Form when a User chooses this Job Builder.
9) Post Processing Function:
This is an advanced setting which can only be set by a Pulse Administrator.
This setting can be used to call Custom Functions after the Form is submitted and the New Project Created.
10) New Job Status:
This is the status you wish to set for the New Project that is created from the Job Builder Form.
The default is ‘Active’. However if you wish the project to be reviewed by a Finance Manger or Project Manager before the Project is marked as ‘Active’, then the status should be set to ‘In Review’