TImesheet submissions can be in one of four different Timesheet Statuses.
To access the Time Report you need to be an Operations user and in the Time Report Access Group (ask the support team for access to this group).
1. Saved and Not Submitted
Timesheets submissions that are ‘saved and not submitted’ occur when a user clicks ‘Save’ on the timesheet page. Users, particularly in the UK / EU who submit time weekly, use this feature to proactively update their timesheets throughout the day.
When timesheet submissions are “Saved” they still need to be “Submitted” for processing.
Often, users forget to click ‘Submit’ the time for approval and supervisors, operations or the finance team need to follow up with the user and ask them to click ‘Submit’
To find all saved time you can use the Time Report or the General Time Approval Page.
Time Report:
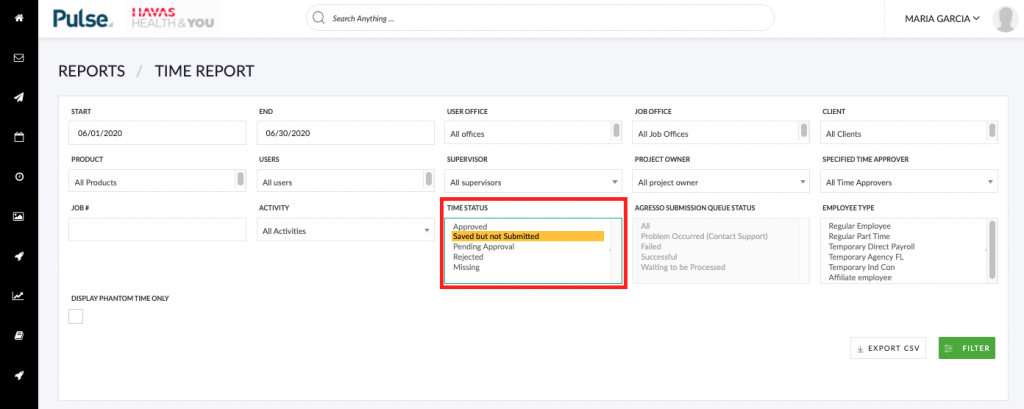
- Go to Reports tab on the navigation
- Click Reports > Time Report
- Set the start and end date for the ‘Saved’ time you are looking for
- Change ‘Time Status’ to ‘saved and not submitted’
- Click Filter or Export
- Using the ‘Name’ column contact the users to submit their time
General Time Approval:

- Go to Timesheets tab on the navigation and click General Time Approval in the sub nav
- Set the start and end date for saved & submitted time you are looking for (by default this is set to the current week plus 3 weeks in the past)
- Open the group for ‘saved and not submitted’ time or click ‘Export’ to export the results
- Using the ‘User’ column contact the users to submit their time
If you have the Timesheet Reminder tool enabled to check for compliance setting ‘submit’ the system will automatically remind the users. Let us know if you want us to turn this on for you!
2. Pending
Time requires approval from the Project Owner for timesheet submissions to Projects or Supervisor for Non-Charge time. You can use the Time Report to view and export results is PM’s who have not approved time.
Time Report:
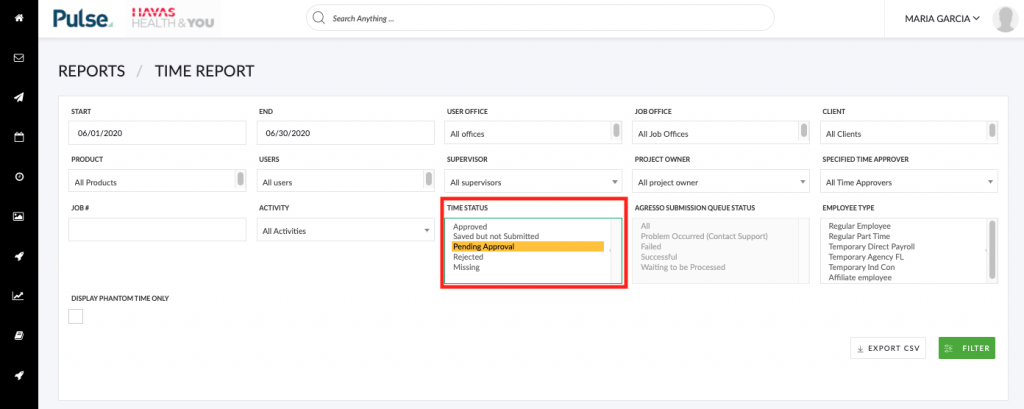
- Go to Reports tab on the navigation
- Click Reports > Time Report
- Set the start and end date for pending time you are looking for
- Change ‘Time Status’ to ‘Pending’
- Click Filter or Export
- Using the ‘Approver’ column contact the PM’s to approve users time!
General Time Approval:
- To view all pending PTO & Non Charge to approve, change the ‘All Users’ filter to ‘My Reports’ and click ‘Go’.
- To view your assigned time to approve, change the ‘All Project Owners’ filter to your name and click ‘Go’.
- If your office uses ‘Time Approver’, change the ‘All Time Approvers’ filter to your name and click ‘Go’ to see all your assigned time to approve
3. Rejected
Time that is rejected is time that has explicitly not been approved for a particular reason. The Project Owner / Supervisor usually leaves a note explaining why it was rejected and what action is required by the user– either updating the hours or moving to a new project. Rejecting time will reject the entire submission. In North America and Canada this will reject the entire day and the UK / EU this will reject the entire week.
Once the user has done this they need to resubmit the time for approval. This will go back to the approval queue to the relevant Project Owners and Supervisors to approve. If a Project Owner already approved time for their project prior to the rejection they will NOT be required to approve the time again.
To find all rejected time you can use the Time Report or the General Time Approval Page.
Time Report:
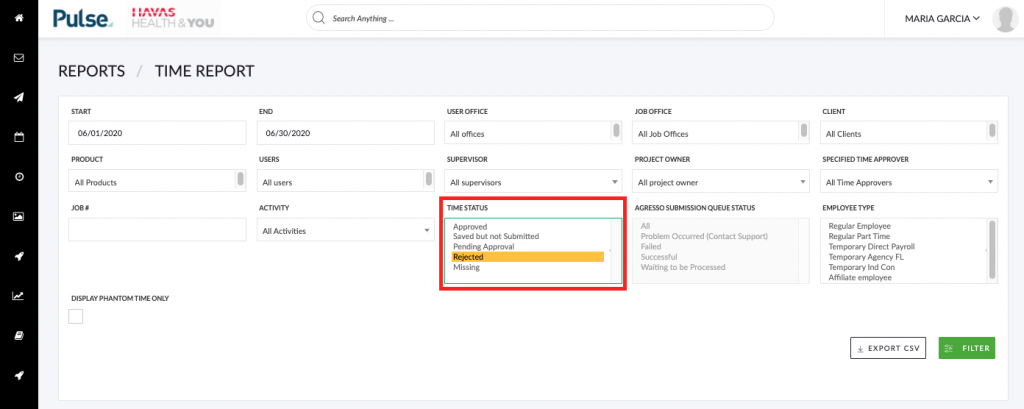
- Go to Reports tab on the navigation
- Click Reports > Time Report
- Set the start and end date for the rejected time you are looking for
- Change ‘Time Status’ to ‘rejected’
- Click Filter or Export
- Using the ‘Name’ column contact the users to prompt them to fix and submit their time
General Time Approval:
To find rejected time on the General Time Approval report:
- Go to Timesheets tab on the navigation and click General Time Approval in the sub nav
- Set the start and end date for rejected time you are looking for (by default this is set to the current week plus 3 weeks in the past)
- Open the group for Rejected time or click ‘Export’ to export the results
- Using the ‘User’ column contact the users to prompt them to submit their time
4. Approved
Approved time is time that has been approved for submission to Agresso and further processing (Hint / remember: the UK/EU have weekly submissions and the US have daily submissions).
Time Report:
You can use the Time Report to ensure all your time has successfully made it to Agresso and which time is in ‘failed’ / or ‘Pulse error’ status.
- Go to Reports tab on the navigation
- Click Reports > Time Report
- Set the start and end date for the approved time you are looking for
- Change ‘Time Status’ to ‘approved’
- Notice how this opened AGRESSO SUBMISSION QUEUE STATUS box. Select ‘ALL’
- Click Filter or Export
What each Agresso Status means:
- ‘Problem‘
Problem with Pulse processing - ‘Failed‘
Failed to submit (please read this article on resolving failed time) - ‘Successful‘
The time is in Agresso - ‘Waiting to be processed‘
In the queue, waiting to be processed. This should take no longer than 30 min
KB.45115