1. ALL REGIONS
ENHANCEMENTS
Enhanced tools to create Dependencies in Timelines
We’re thrilled to introduce key enhancements to the Timelines Tool, aimed at making the management of dependencies much more intuitive by providing three new additional methods for linking items as dependencies in the table view of a Timeline:
- Clicking the new dependency dropdown in the upgraded predecessor column of the table view of a Timeline
- Typing abbreviations into the new upgraded predecessor column of the table view of a Timeline
- Selecting multiple items and using right-click to “Add Dependencies”
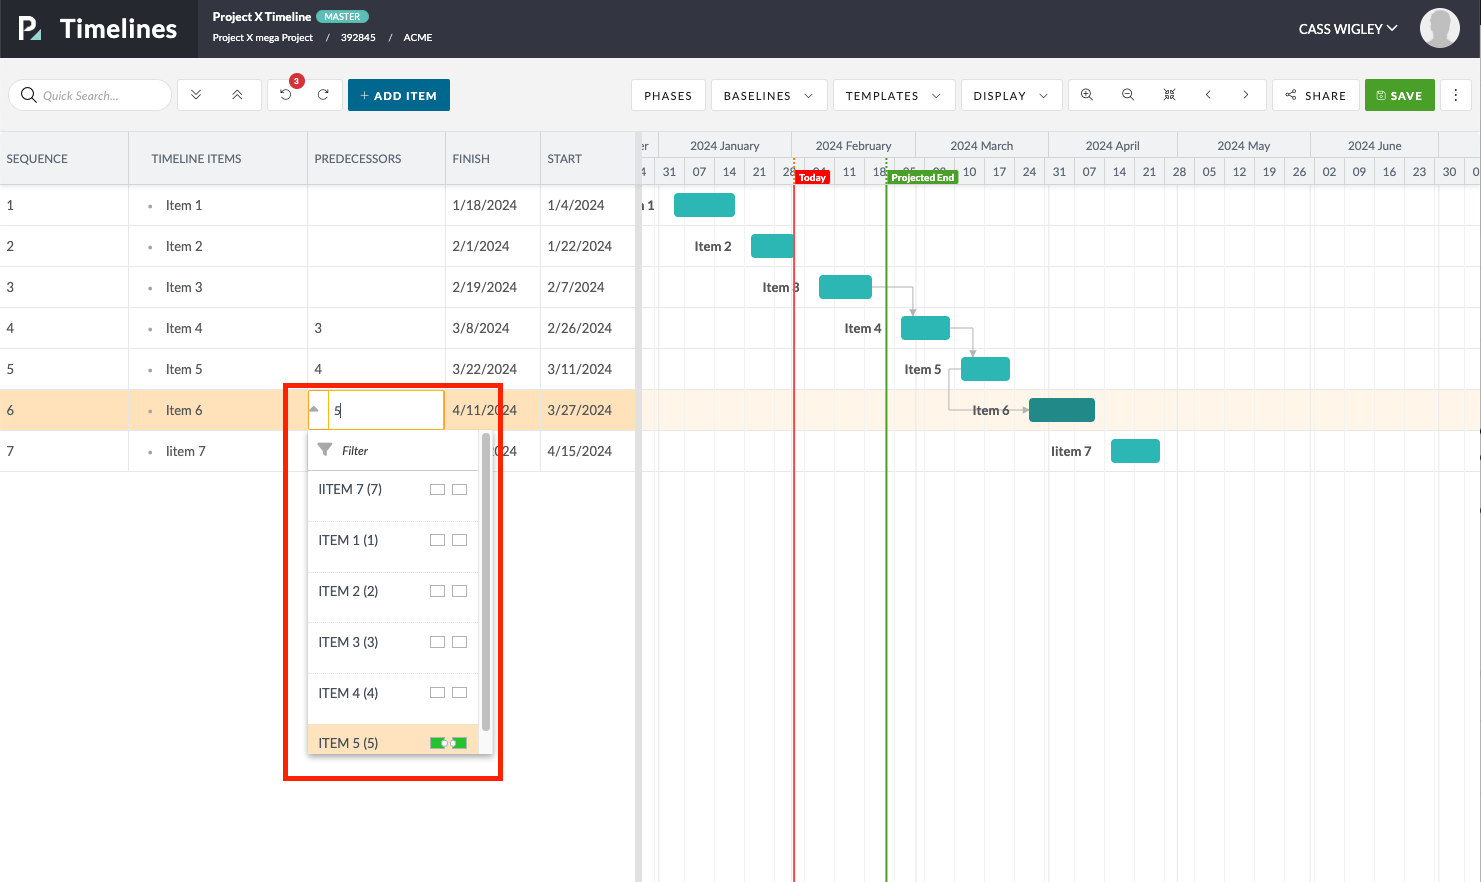
[#62659] ENABLE ABBREVIATIONS & INLINE EDIT FOR PREDECESSOR COLUMN
New “Sequence” Column
The “Sequence” Column functions similarly to numbering rows in spreadsheet tools like MS Excel. Each row receives a unique number that remains constant, unaffected by rearranging rows or altering the sorting order. This stability provides a reliable reference point for each row, which proves beneficial when dealing with numerous Timeline Items sharing similar or identical names.
The “Sequence” Column can also be used to directly input dependencies using text abbreviation shortcuts by entering an item’s current sequence number (see below).
Predecessor Column Upgrade
The Predecessor Column has now been upgraded into an editable ‘dependency’ field type – previously it was a read-only column that would display the title of the dependent item.
Predecessor Column shows each predecessor’s current Sequence ID
The first thing you will notice is that we now show the current Sequence number(s) of the dependent items instead of the title of the Item(s). This makes it easier to manage Timelines where there are many items with the same title as the Sequence number is always unique and enables you to find the dependent item more easily by locating the corresponding row.
Create dependency using the Dependency Dropdown
Users can click the dropdown icon to create a predecessor relation by selecting from a list of other items in the Timeline that shows the title of the item followed by its current Sequence ID in brackets followed by an iconic representation of the 4 dependency types:
The type of dependency can be selected using the iconic representation of the various dependency types explained below:
 | FS (Finish to Start) – This is the default dependency type |
| SS (Start to Start) | |
| SF (Start to Finish) | |
| FF (Finish to Finish) |
Create Dependency by typing Abbreviations and Shortcuts:
Alternatively, for power users who are familiar with the abbreviations used to create dependencies, you can also type directly into the field to create dependencies.
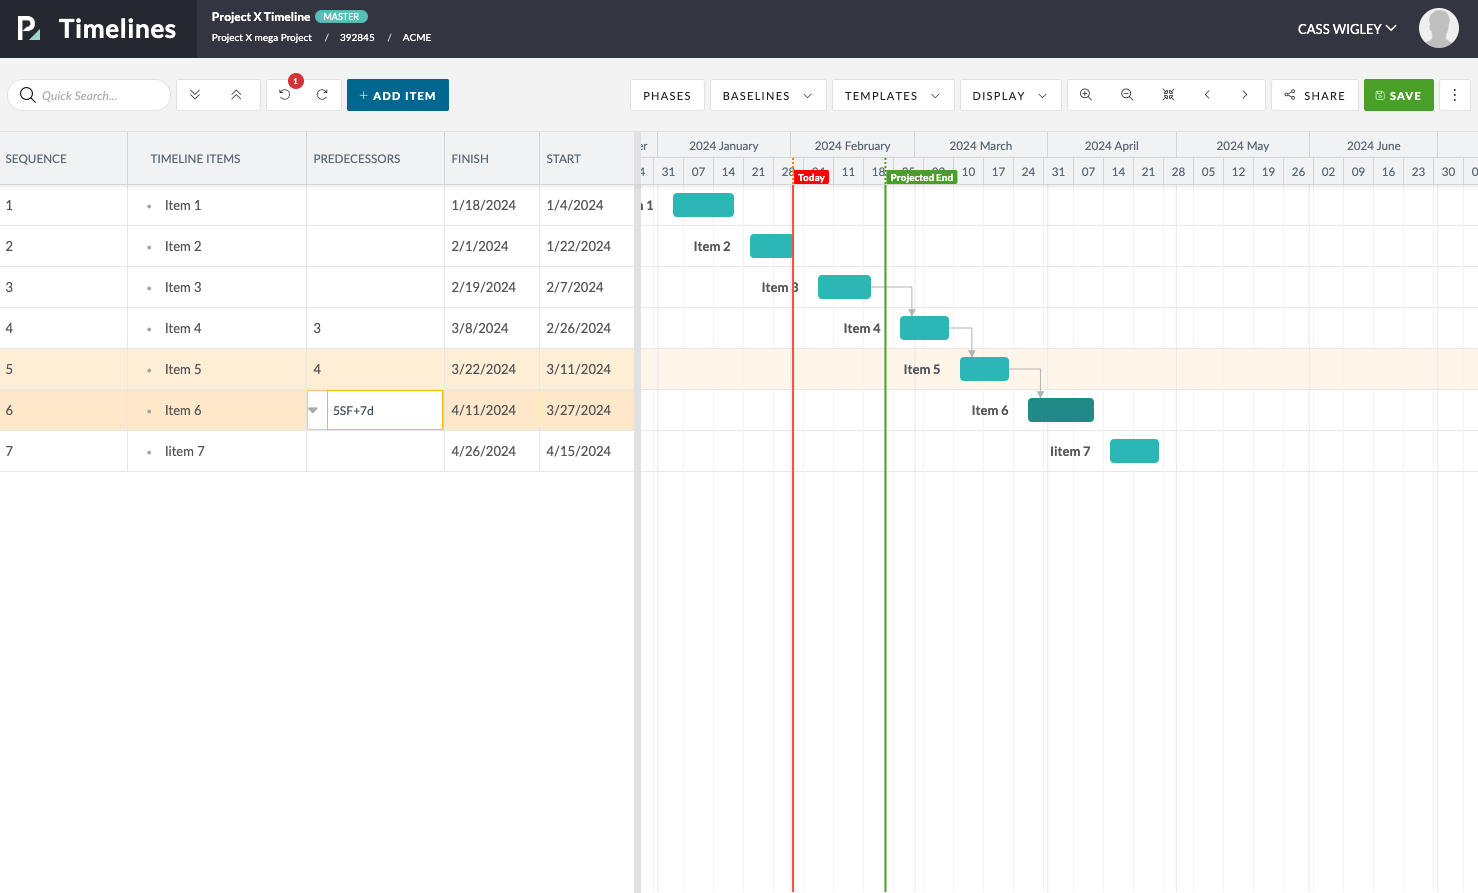
Each dependency is shown in the format “Sequence ID” + “Dependency Type”(optional – FS will be used by default) + “Lag(optional)” as a list separated by a semi-colon “;”.
- Sequence ID
The current Sequence ID for the Item (eg “5”) - Dependency Type
The 4 abbreviations FS(Finish to Start – default ) FF (Finish to Finish) SF (Start to Finish) SS (Start to Start) can be uppercase or lowercase - Lag
Written as plus/minus symbol + integer + “d” eg would mean one-day lag when “-1d”
Some Examples:
- Finish-to-Start Dependency (FS) with 2 days lag:
3FS+2d(or3+2d): Current item starts two days after the completion of Item 3.
Please Note: Because FS is the default, when FS is entered into the cell, it is not displayed to the end user in the field after pressing enter.
- Start-to-Start Dependency (SS) with no lag:
2SS: Current item and Item 2 start simultaneously.
- Finish-to-Finish Dependency (FF) with 1 day lag:
4FF+1d: Current item finishes one day after the completion of Item 4.
- Start-to-Finish Dependency (SF) with 3 days “negative” lag:
6SF-3d: Current item finishes three days before the start of Item 6.
[#65113] BR: ENABLE ‘ADD DEPENDENCIES’ OPTION FOR ‘RIGHT CLICK’ IN GANTT
You can now add dependencies between multiple items in the Timeline Tool:
- Select more than one item in the left-hand panel
- Right-click
- Click “Add Dependencies”
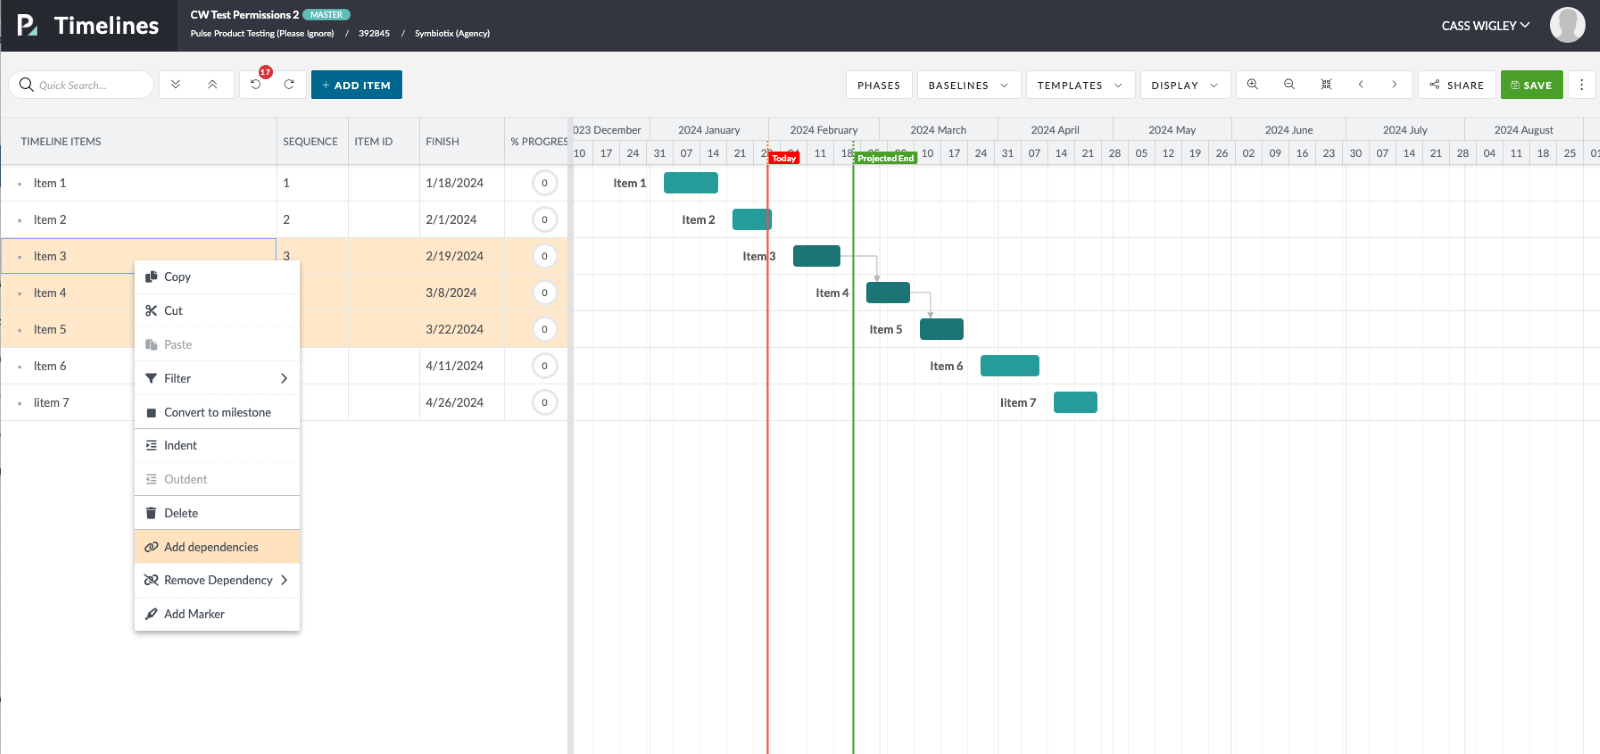
Dependencies are added with the default values of FS (FInish to Start) with 0 days lag.
ENHANCEMENTS
[#64384] BE: ENABLE HISTORY TAB FOR OTHER USERS TABLES
History tracking for changes to User Settings in the Address Book is now available in the History tab of the User Detail modal:
.
[#64985] FE: ADD A FILTER TO THE TIME REPORT & PENDING APPROVAL FOR AGRESSO USER STATUS
We added a feature where a user can filter by the Users Employee’s employment status (Agresso Linked Users) on the Time Report & Pending Approval based on the.
The options are “Termed” and “Active” and only shows for Users in Agresso Linked Offices.
[#65084] BE: CHANGE THE AUTOMATIC NAMING CONVENTION FOR BRAND UNIQUE CODE & MAGNITUDE CODE
The automatic naming convention for Magnitude Code and Brand Unique Code has been updated. The new convention provides a more refined structure, incorporating the first 4 letters of the Master Client Unique Code and Brand Name. This change aims to enhance clarity and maintain uniqueness while simplifying the naming process for users.
[#65085] BE: CHANGE THE AUTOMATIC NAMING CONVENTION FOR MAGNITUDE CODE DESCRIPTION
We’ve made a simple and effective change to the way Brand names are automatically generated when creating a new Brand. Here’s what you need to know:
- The Magnitude Code Description is now the same as the Brand Name.
- The Magnitude Code Description still doesn’t need to be unique.
This update streamlines the brand naming process, making it more intuitive and consistent. Now, when you create a new brand, the Magnitude Code Description aligns directly with the Brand Name for a clearer and more straightforward experience.
[#65086] BE: CHANGE THE AUTOMATIC NAMING CONVENTION FOR PRODUCT UNIQUE CODE
We’ve updated the automatic naming convention for Product Unique Code. The new convention simplifies naming, incorporating attributes and ensuring uniqueness while adhering to character limits. Whether your product has attributes or not, the new system ensures clearer and more efficient product naming.
New Naming Convention:
- With Attributes: Master Client Unique Code [4 Letters] + Brand Name [3 Letters] + first 2 letters of each attribute.
- Without Attributes: Master Client Unique Code [4 Letters] + Brand Name [3 Letters] + Pulse Product ID.
- Alphanumeric, max 12 characters, all uppercase, no spaces.
- Product Code must be unique.
[#65087] BE: ALLOW ‘X’ AS A MAGNITUDE CODE ON MULTIPLE BRANDS
We’ve made a simple yet impactful change to the rules governing Magnitude Codes:
Change: Magnitude Code uniqueness is a standard rule, but we’ve introduced an exception for the letter “X.”
What’s New: Superusers now have the ability to set Magnitude Code “X” on multiple brands.
Global Reporting Enhancement:
- Facilitates global client reporting by allowing the use of Magnitude Code “X” for multiple brands.
- Supports flexibility in reporting with the option for a blank code or using “X” as a designation, aligning with current team practices.
- This update simplifies Magnitude Code management, offering greater flexibility for Superusers and enhancing global reporting capabilities to align with diverse
[#65002] OPEN LINKS IN NEW WINDOW
We’ve made a user-friendly update! Now, when you click on links within a task description or task comment, they will always open in a new tab. This enhancement ensures that you won’t lose your focus and can seamlessly explore linked content while keeping your task page readily accessible. Enjoy the improved browsing experience!
FIXES
[#64967] BUG: ADD NON-CHARGE DOESN’T SELECT THE JOB AUTOMATICALLY
We’ve addressed a missing non-charge job in Timesheets > Add Non-Charge modal window. This job is clearly defined for every office, so can be pre-filled.
[#65090] BUG: ISSUE APPROVING A PROJECT THE FIRST TIME WHEN THE MASTER CLIENT ALREADY EXISTS IN AGRESSO
We’ve addressed an issue encountered during the creation of a project linked to a master client integrated with Agresso. Upon the initial attempt to approve the project, an error occurred as the system processed the creation of the associated brand, product, etc. However, clicking ‘approve’ a second time resolved the issue, and the project was successfully submitted without any further complications. This enhancement ensures a smoother experience when creating projects linked to integrated master clients.
[#65091] FIX: BRANDS API FOR EUROPE
In this release, we’ve addressed an issue reported by Europe Agresso concerning the generation of URLs. The problem was related to the incorrect usage of ‘-web-api’ in the URLs.
[#65092] REVIEW DETAIL PAGE SOMETIMES DOES NOT SHOW THE DECISIONS MADE OR ALLOW FOR DECISION TO BE MADE
We have fixed an issue that was intermittently causing the Review Detail Stage Matrix Decision dropdowns to incorrectly display ‘Search’ rather than the latest decision for the reviewer.
2. UK
FEATURES
[#63841] ADD NEW COST-BASED PRODUCT DELIVERABLES (PODELIV) ACTIVITY TREATMENT
We have added support for the new Agresso finance activity type called ‘Cost-based product deliverables’. Those types of activities can be raised in Estimates with a two-level specification of the Activity and Product. Those are then transferred into linked Purchase orders too.