FEATURES & ENHANCEMENTS
![]()
![]()
![]()
[#51451] Add ability to convert Planned Projects to Real Projects in the Pulse Planner
You can now convert a “planned” Project to a “real” Project when using the Pulse Planner!
To convert a planned project to a real project all you need to do is click on a planned project to open the pop-over and then click the ‘CONVERT TO REAL PROJECT’ button.
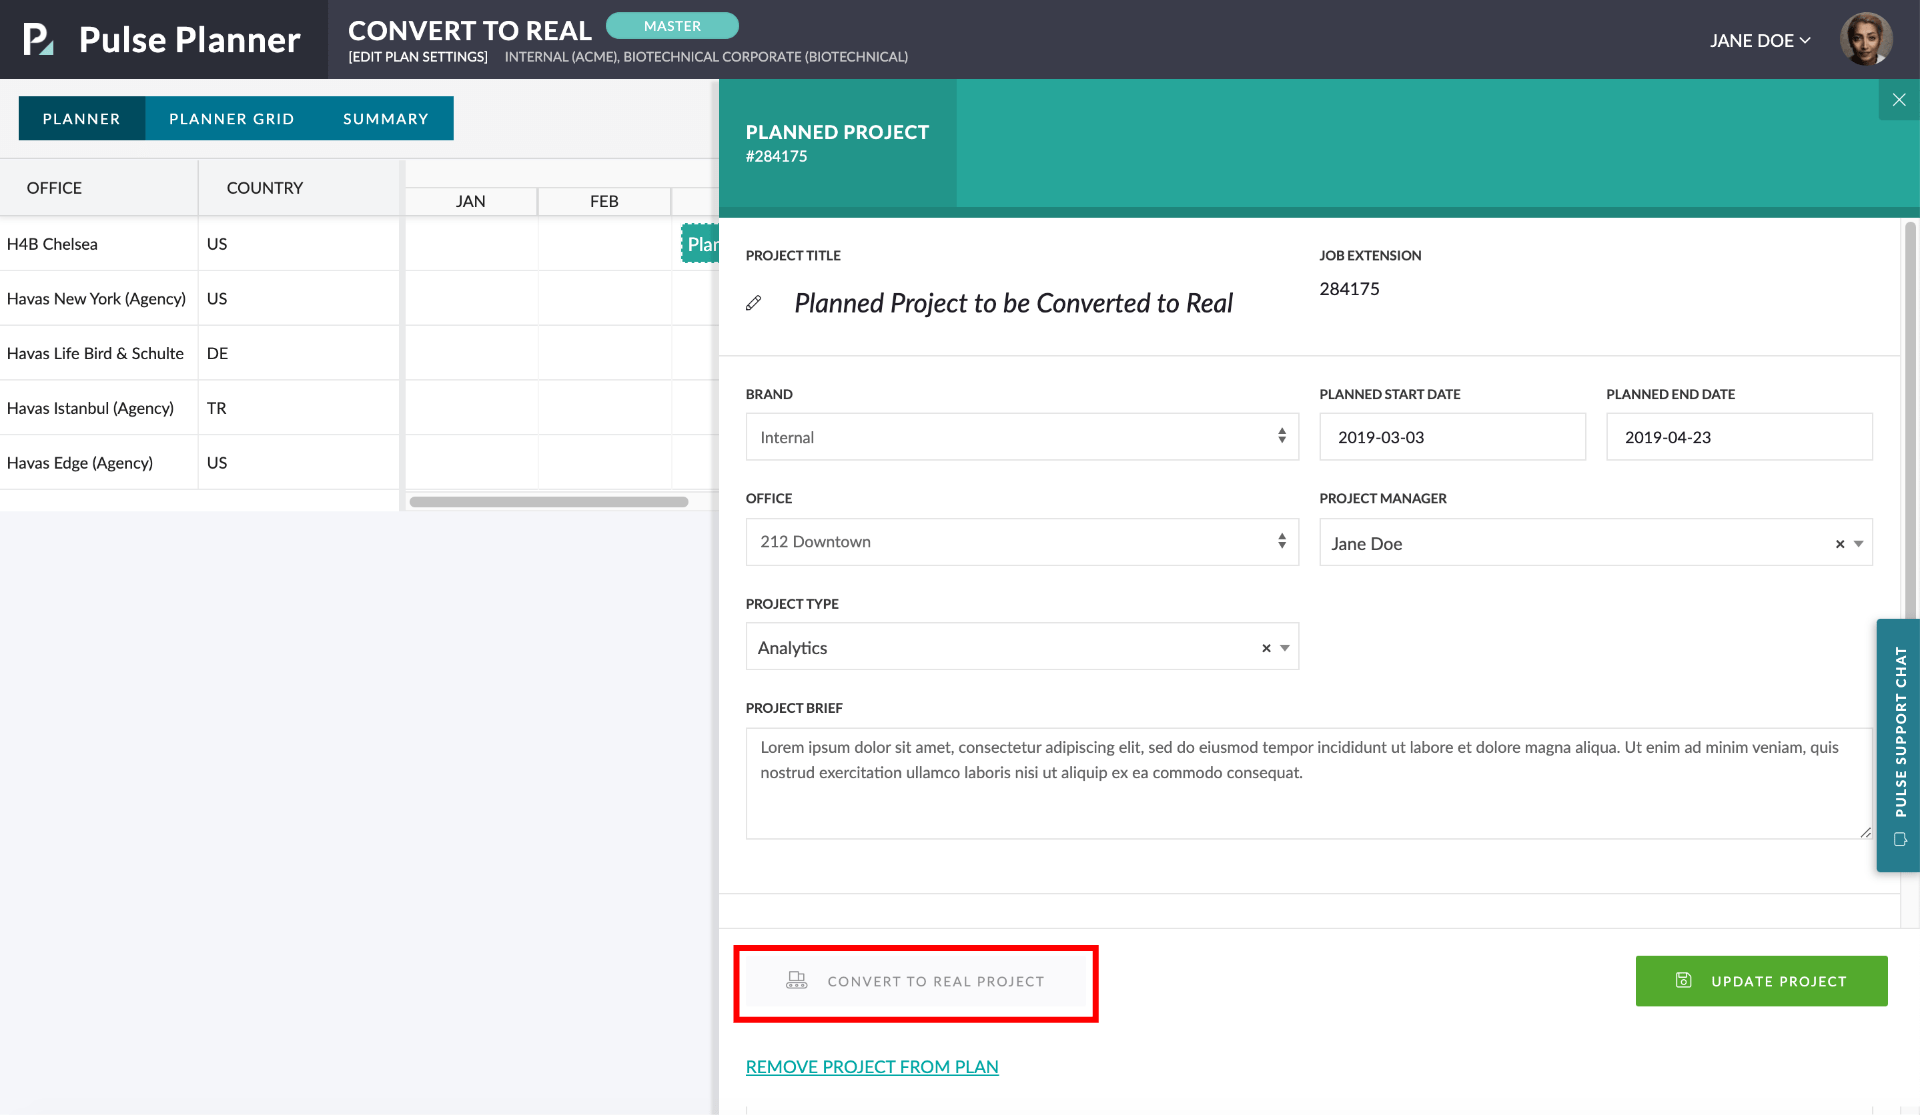
This will direct you to the project wizard with the planned Project’s fields auto-populated in the first step of the Project Wizard.
From there follow the usual steps through the Project Wizard to set up Agresso Financial fields, select a Template, and invite Users.
Please Note: All the attributes of the Planned Project must be saved before converting to a Real Project.
[#49564] Increase the Character Limit on Pulse Job Title
Now that we allow users to set a naming convention it is possible that the title will exceed the 250 character limit. This limit is imposed because Agresso can’t accept more than this amount.
The solution for this is to allow and save the full job title in Pulse but truncate this before sending it to Agresso IF the title exceeds 250 characters.
[#51121] Timesheet Approvals – Enhance the Auto Approve Process
To further enhance the control of timesheet auto-approvals a new Ledger (aka Agresso Client) level setting was introduced a few weeks ago. This setting allows auto-timesheet approval on or off for the entire Agresso Client within Pulse.
This was working with the Finance Profile level setting auto approve timesheets after a specified amount of time:
- 0 – disabled
- 1 – 24hrs
- 2 – 48hrs etc
We have slightly altered this by:
- introducing a Finance Profile level setting to ‘Enable Auto Timesheet Approval’
This will only be editable if the Agresso Client level setting of ‘Enable Auto Timesheet Approval’ is set to ‘Yes’, and - adding options on how often to auto approve timesheets is now a dropdown that ranges from “Immediately” to 7 days.
This will only be editable if the Agresso Client level setting of ‘Enable Auto Timesheet Approval’ is set to ‘Yes’.
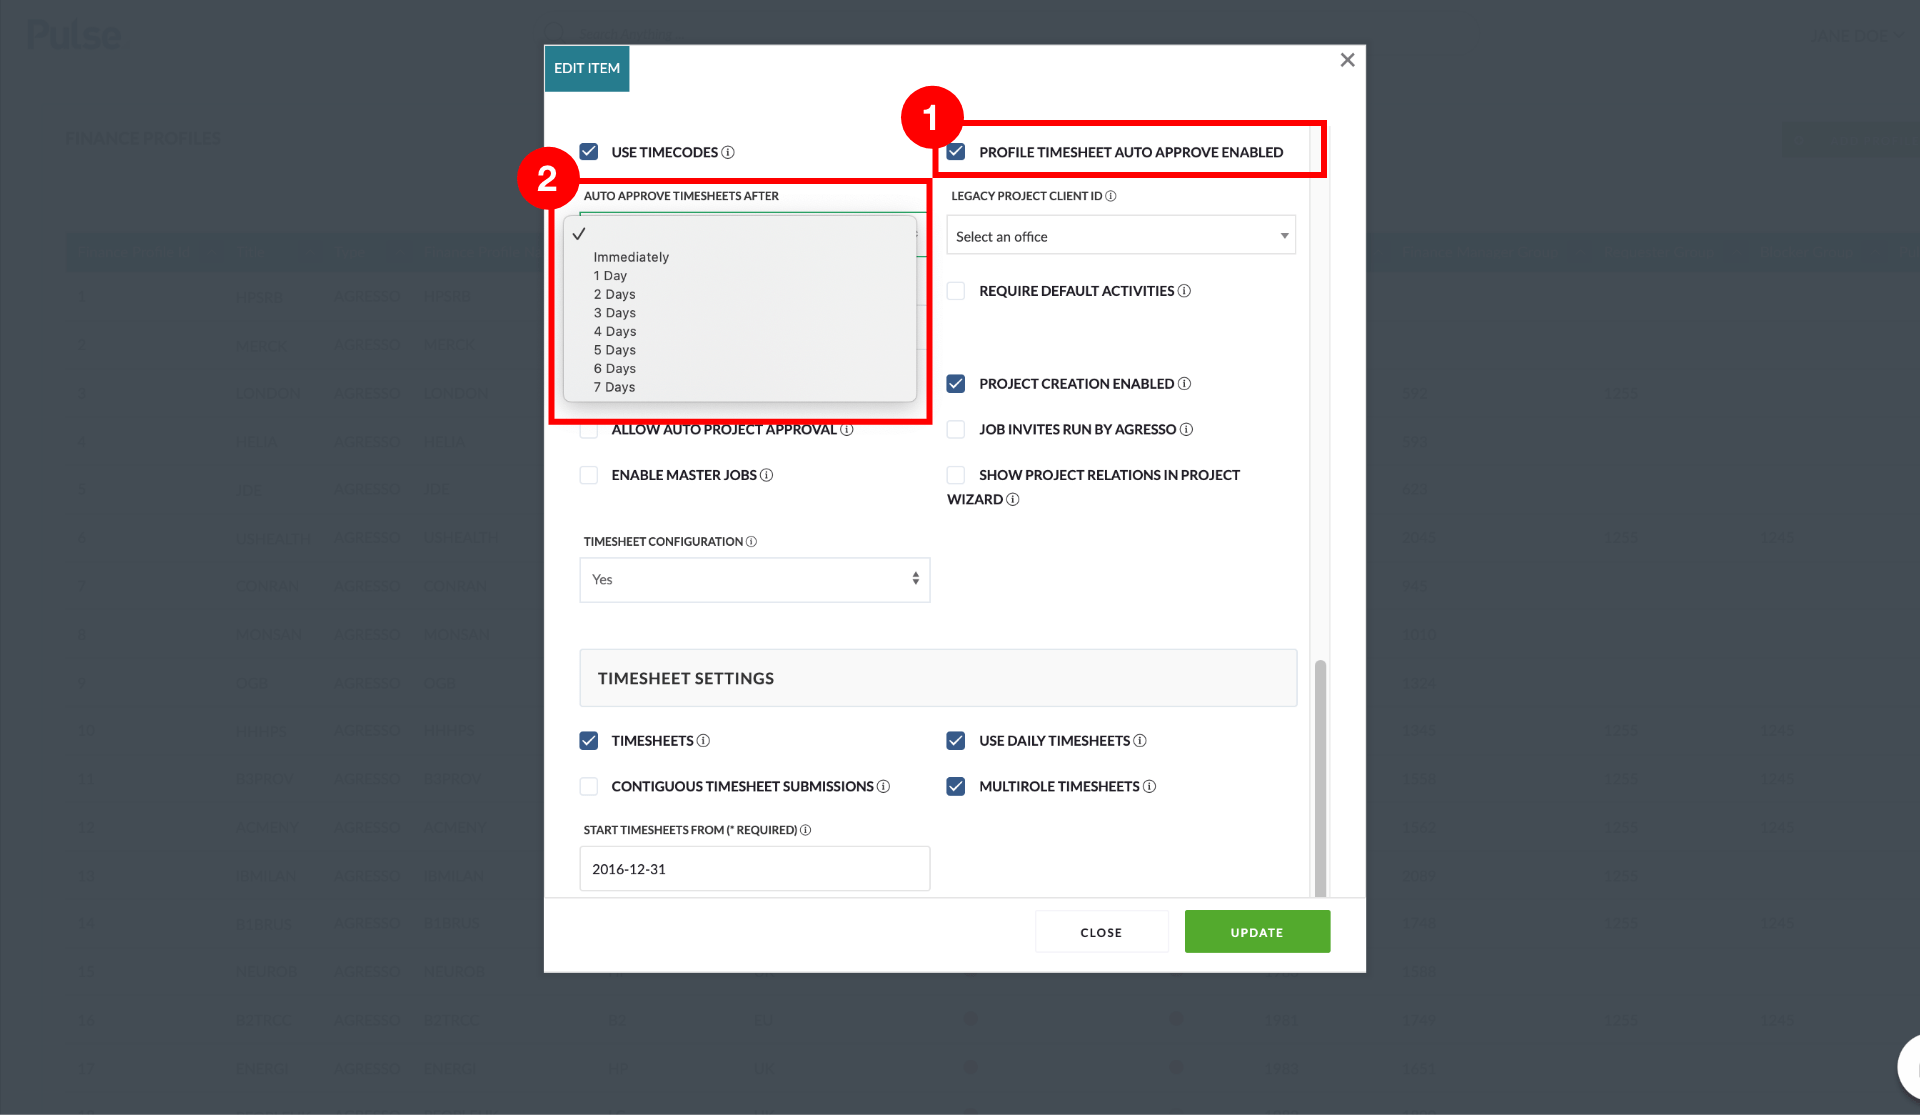
Although these are not settings you as a user can see or use, it allows our team more flexibility on how you would like to approve time within a Finance Profile.
[#51204] Add File Name to the Form Data widget & exported file
When using Job Builders or Form Questions (like the closeout form), you have the option to upload a file – or multiple files – to a form. The filenames of files that are uploaded to a form are now available as an exportable field that can be displayed as a comma-separated list in the “Upload File” column in the Data Grid for the Portal Pages.
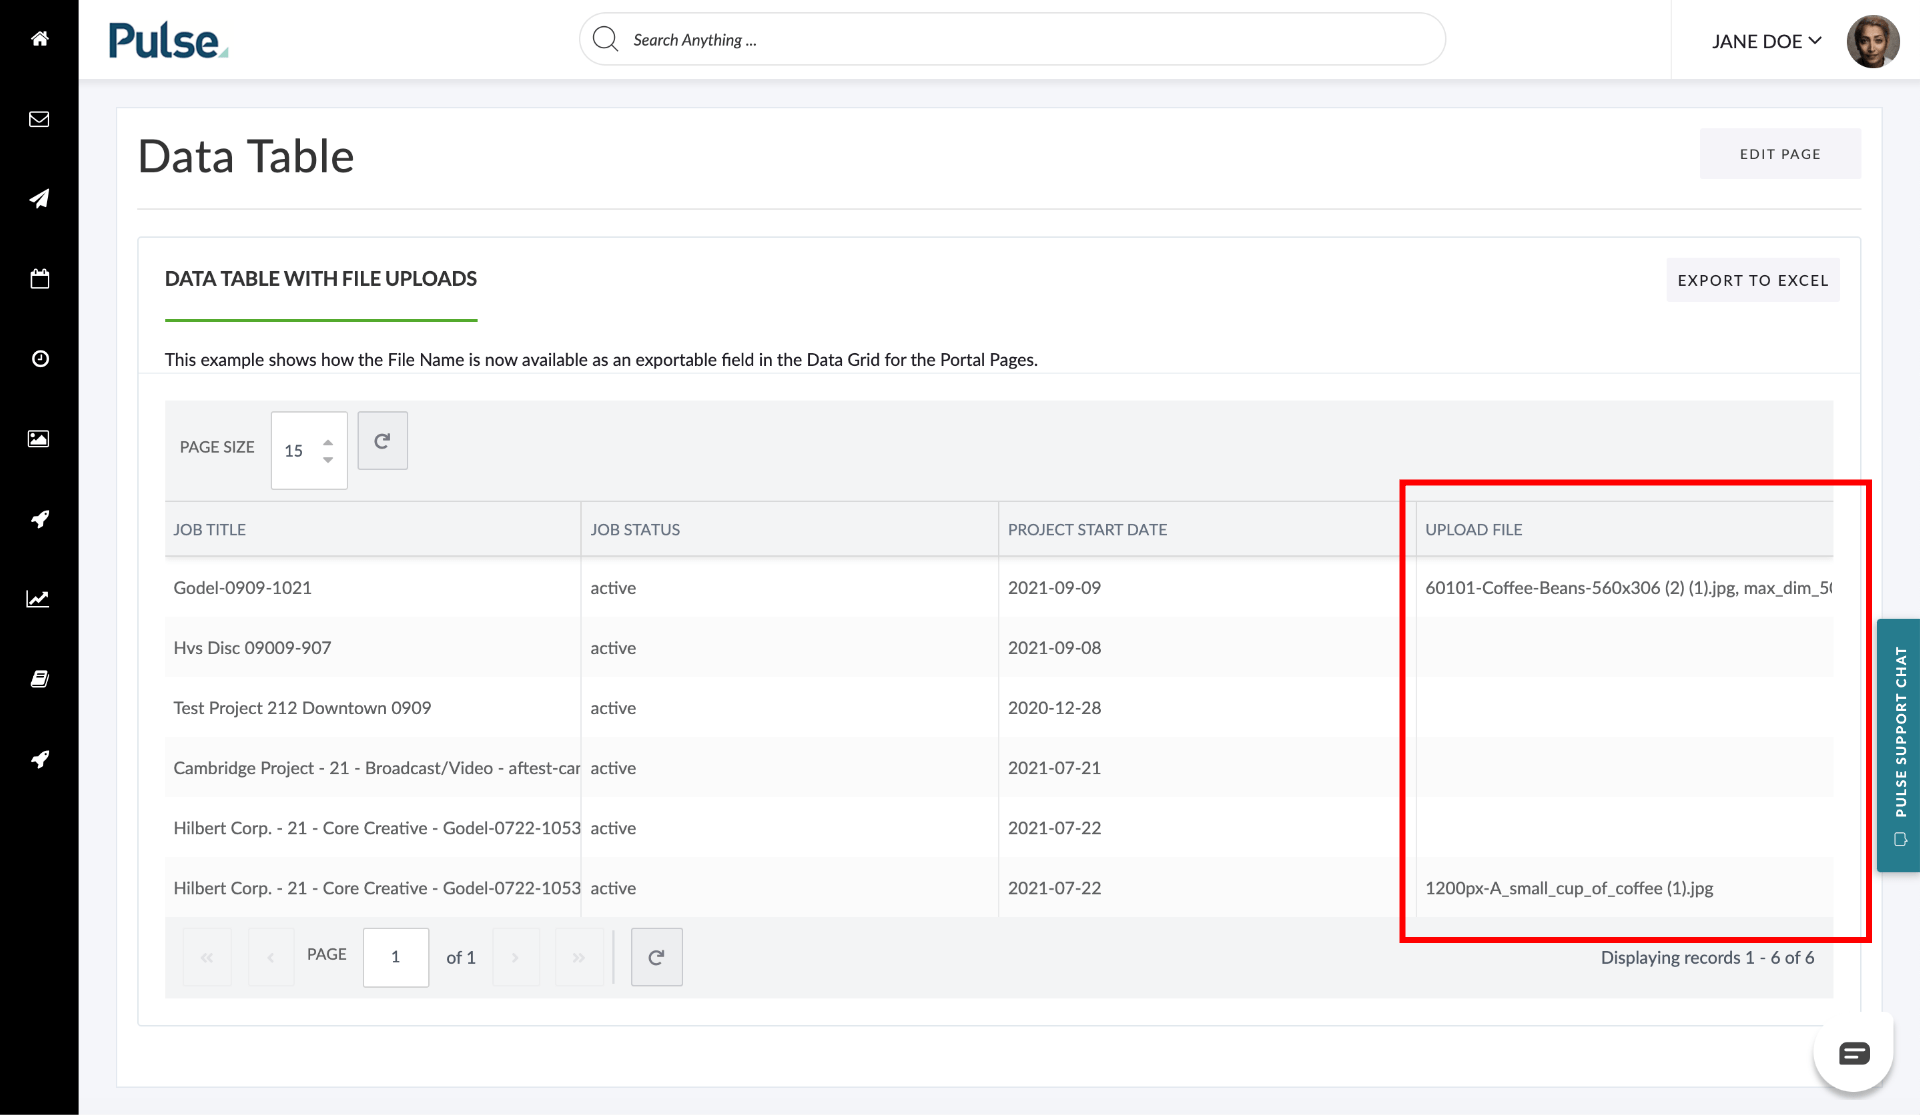
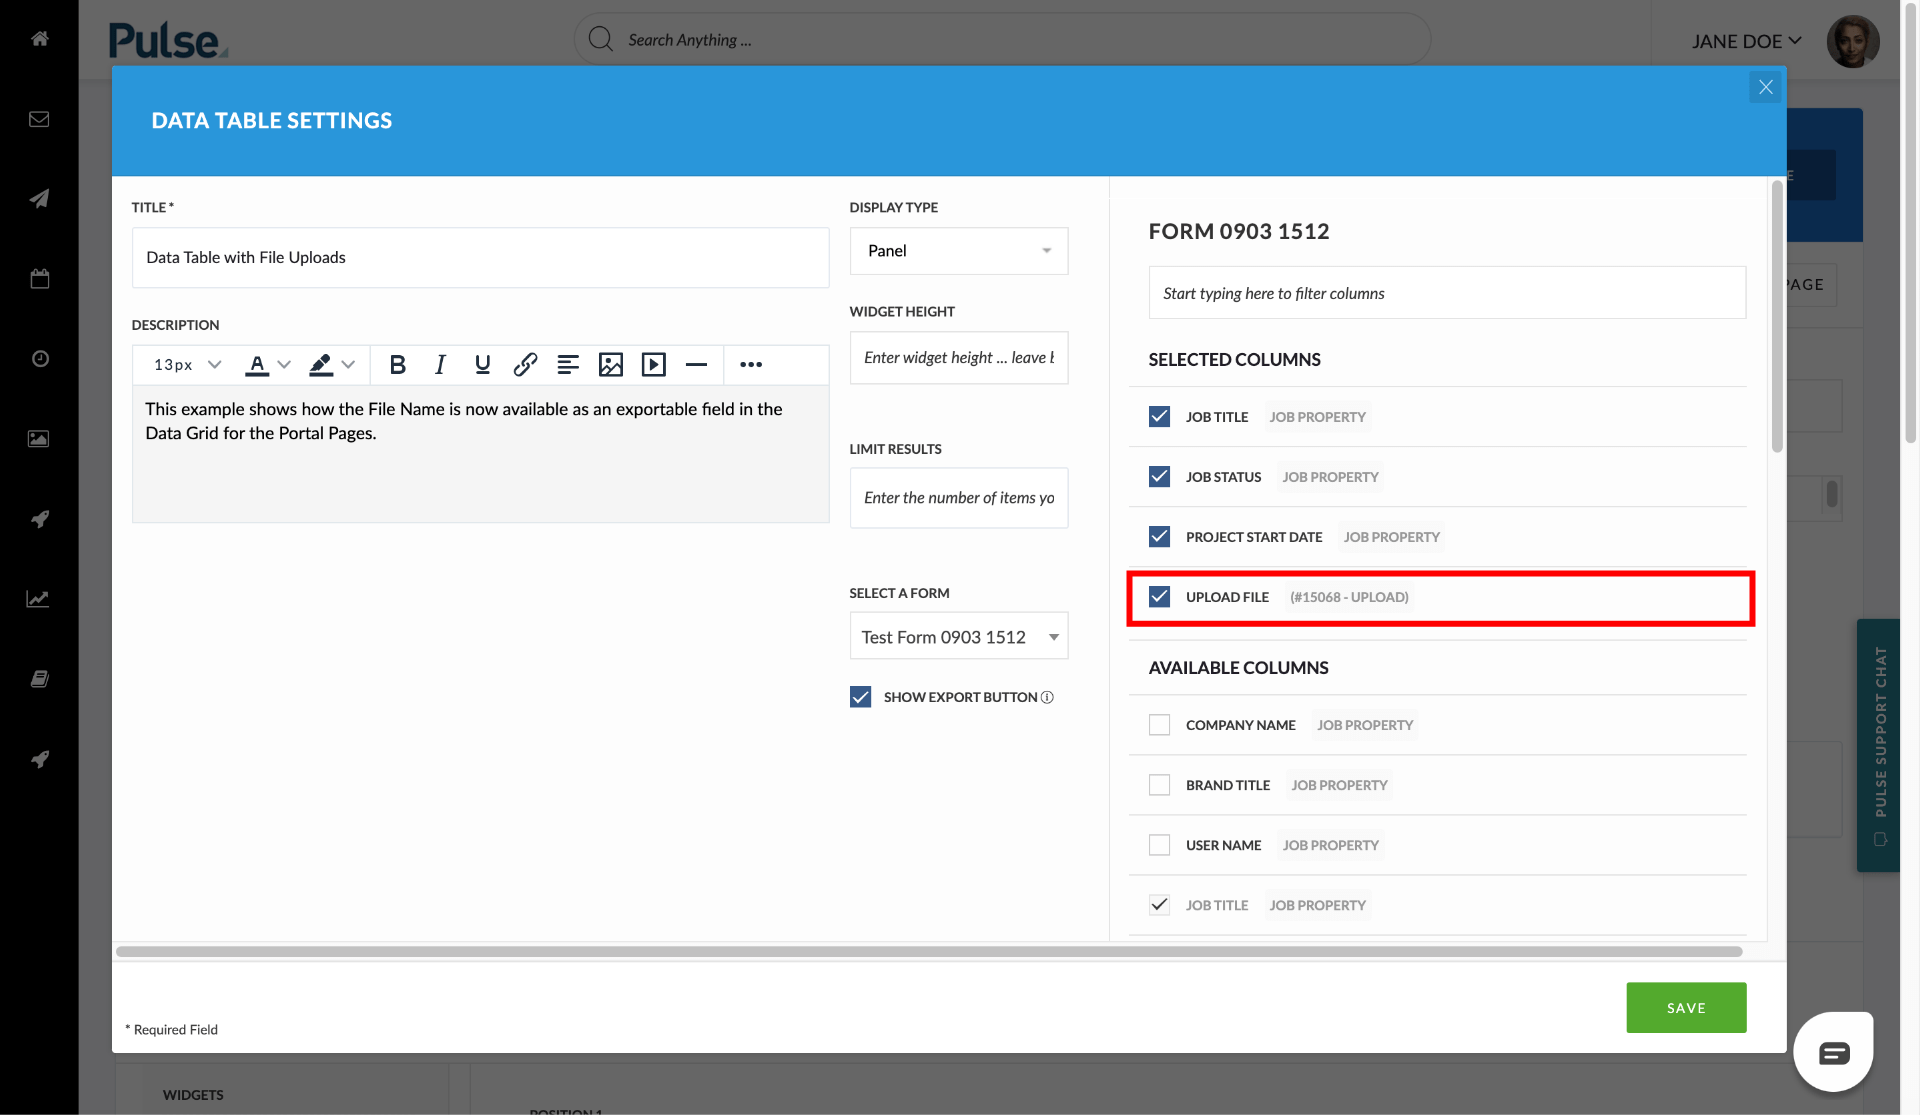
To show the “Upload File” column check the option in the Data Table Model “Selected Columns” settings.
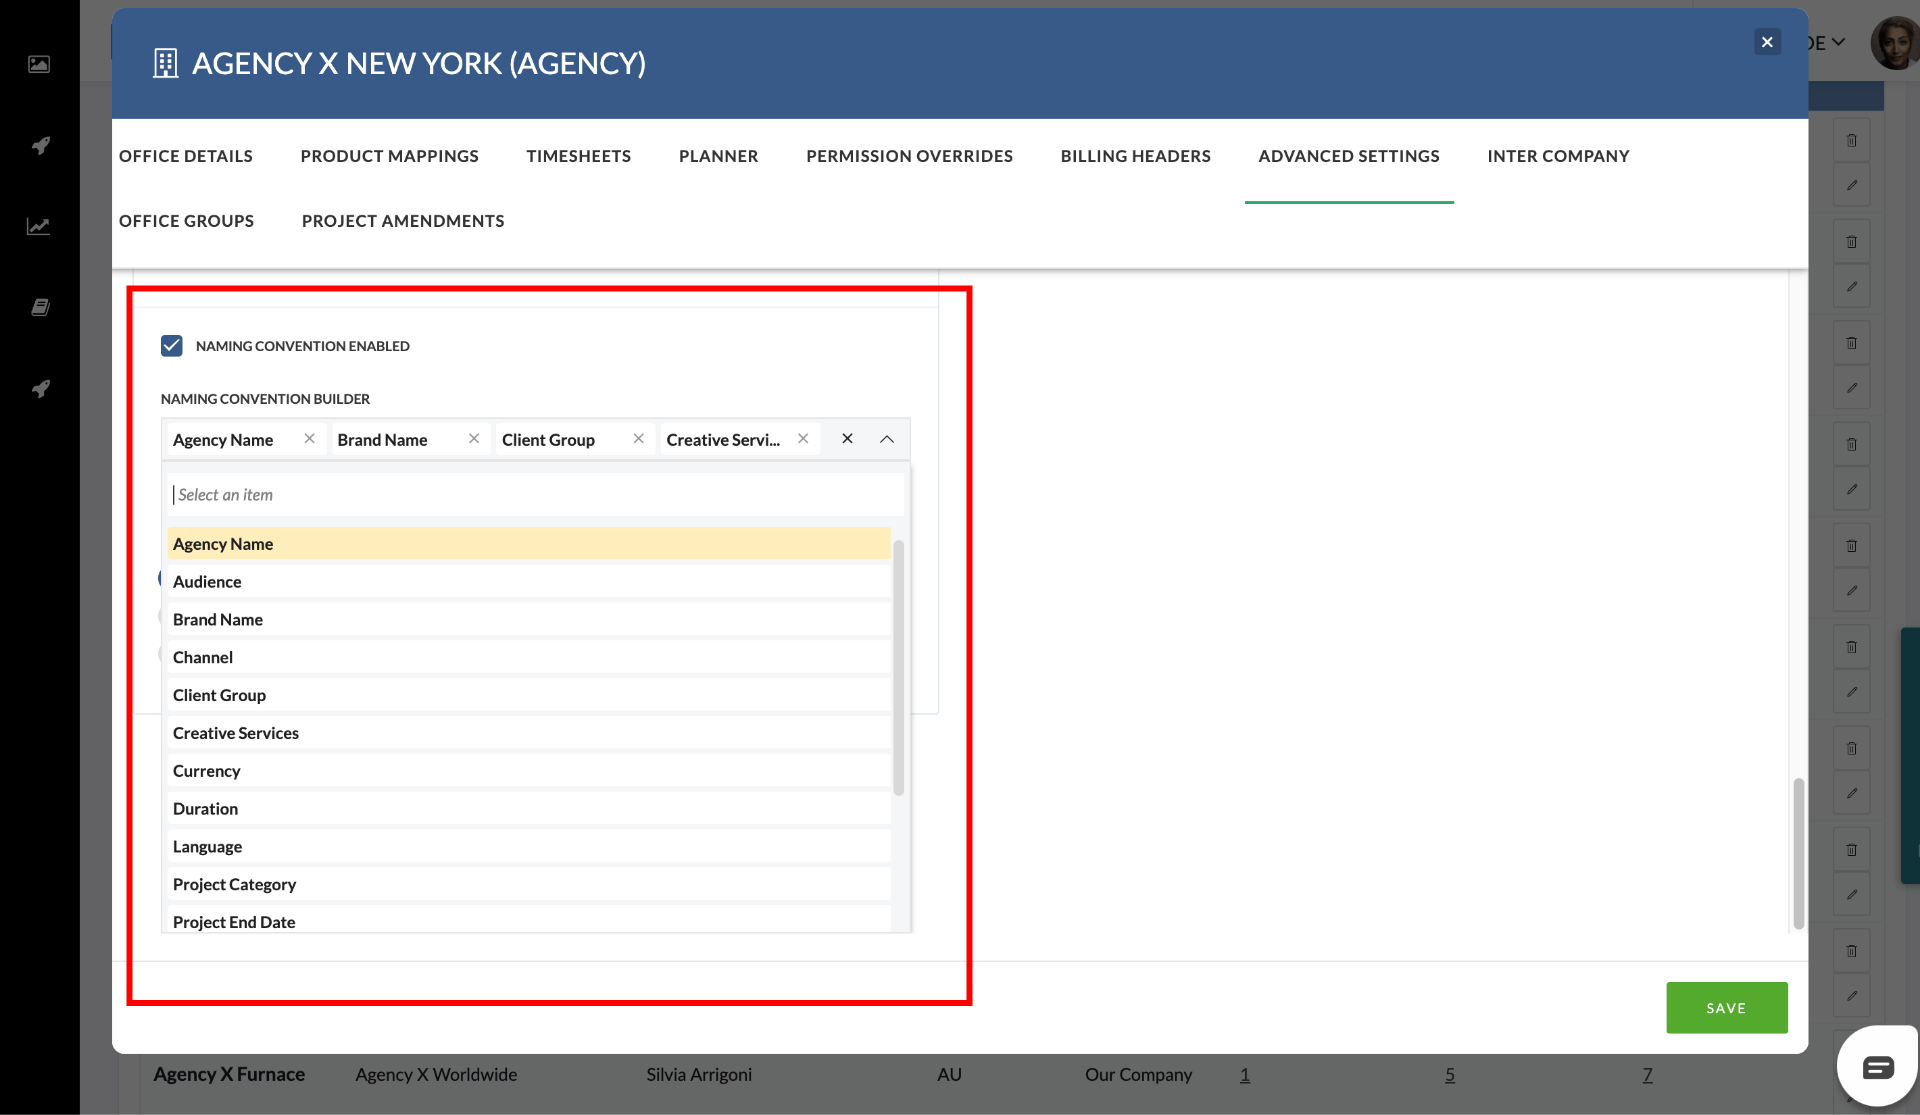
[#50591] Additional fileds to use in Project Naming Conventions
We have added some additional fields into the Project Naming convention tool. This gives you more flexibility to encode valuable meta-data into your Project Names.
These fields are:
- Agency Name
- Project End Date
- Pulse Currency
- Channel (Job Attributes)
- Audience (Job Attributes)
- Creative Service (Job Attributes)
- Language (Job Attributes)
- Duration (Job Attributes)
- Pulse Project Type
- Pulse Audience
[#50777] Asset Detail Update: View linked Task(s)
In the new Asset Detail pop-over, we now show if an Asset is linked to any Task or Tasks. Clicking the link will open the linked Task in a new tab.
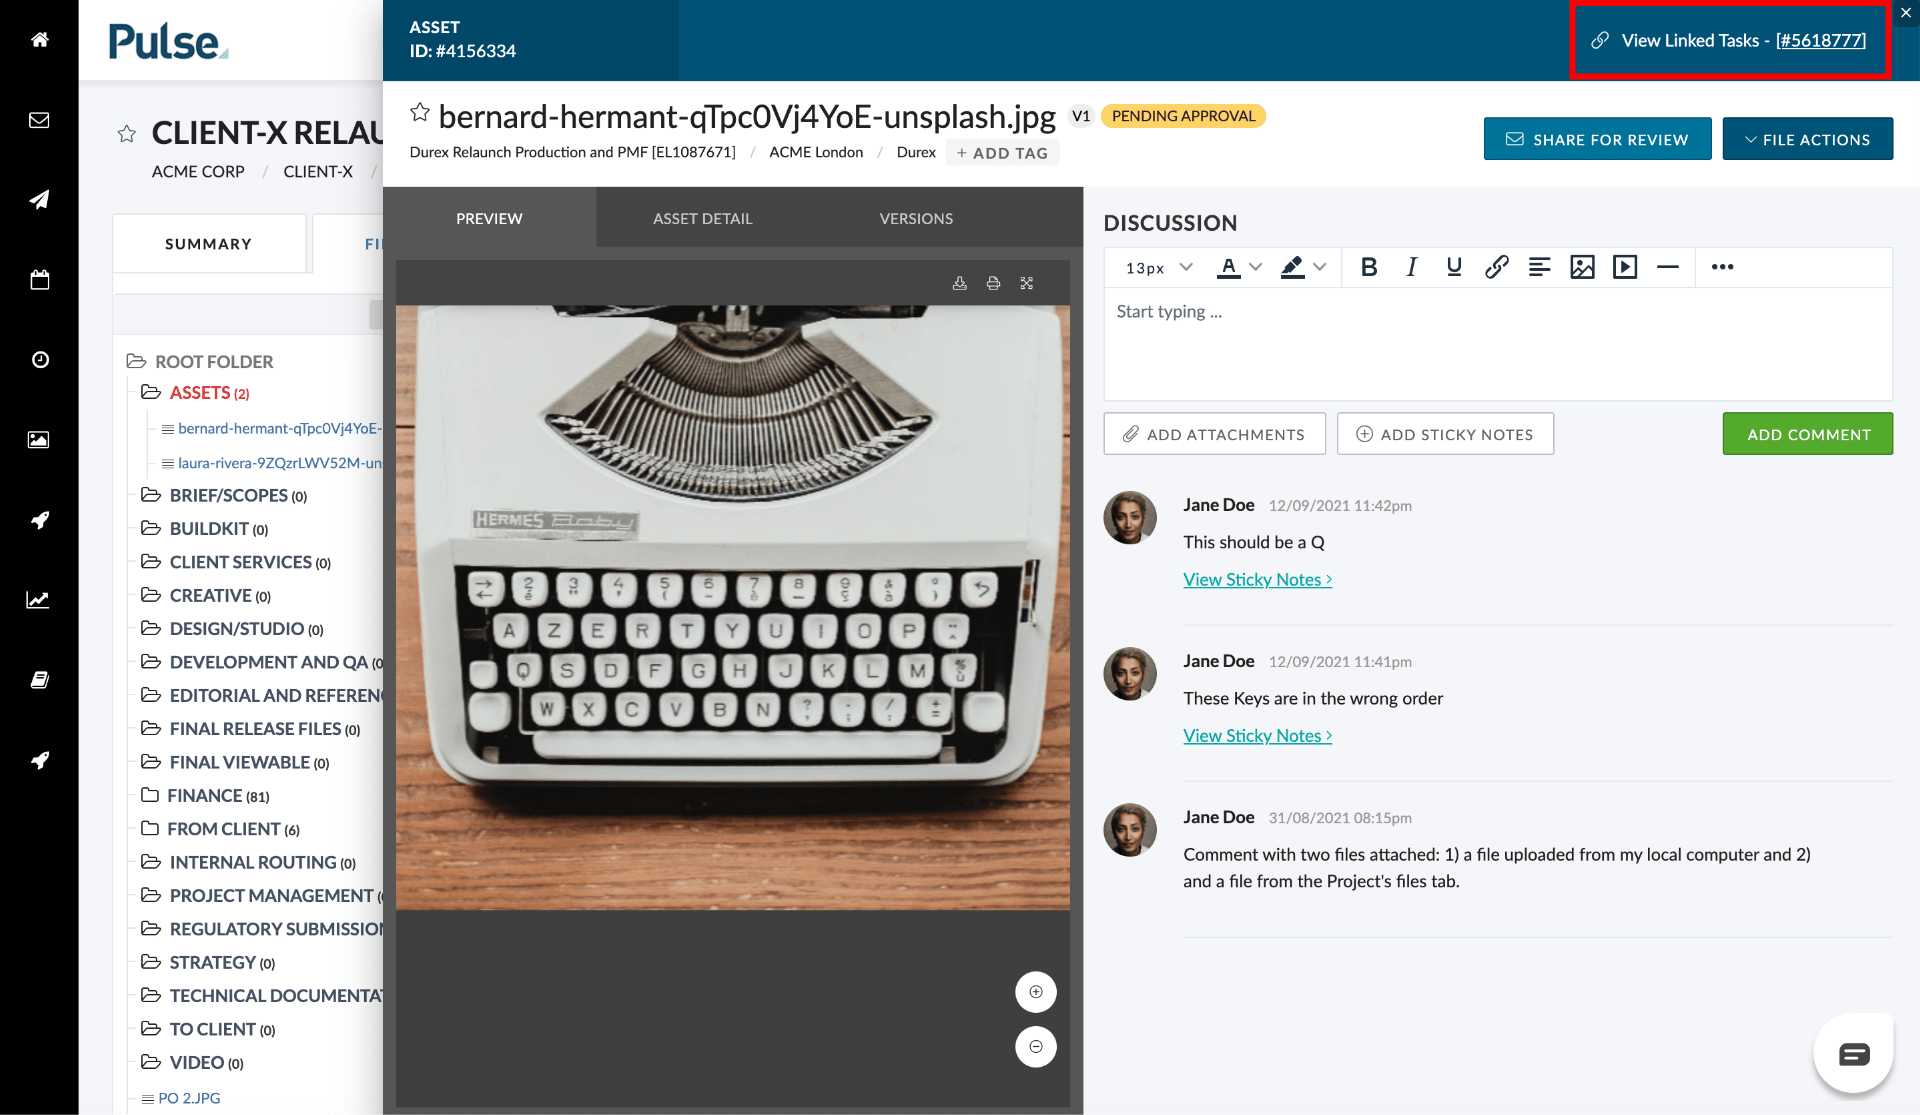
If the File is linked to multiple tasks, then each Task ID is listed. Clinking on a Task ID will open that task.

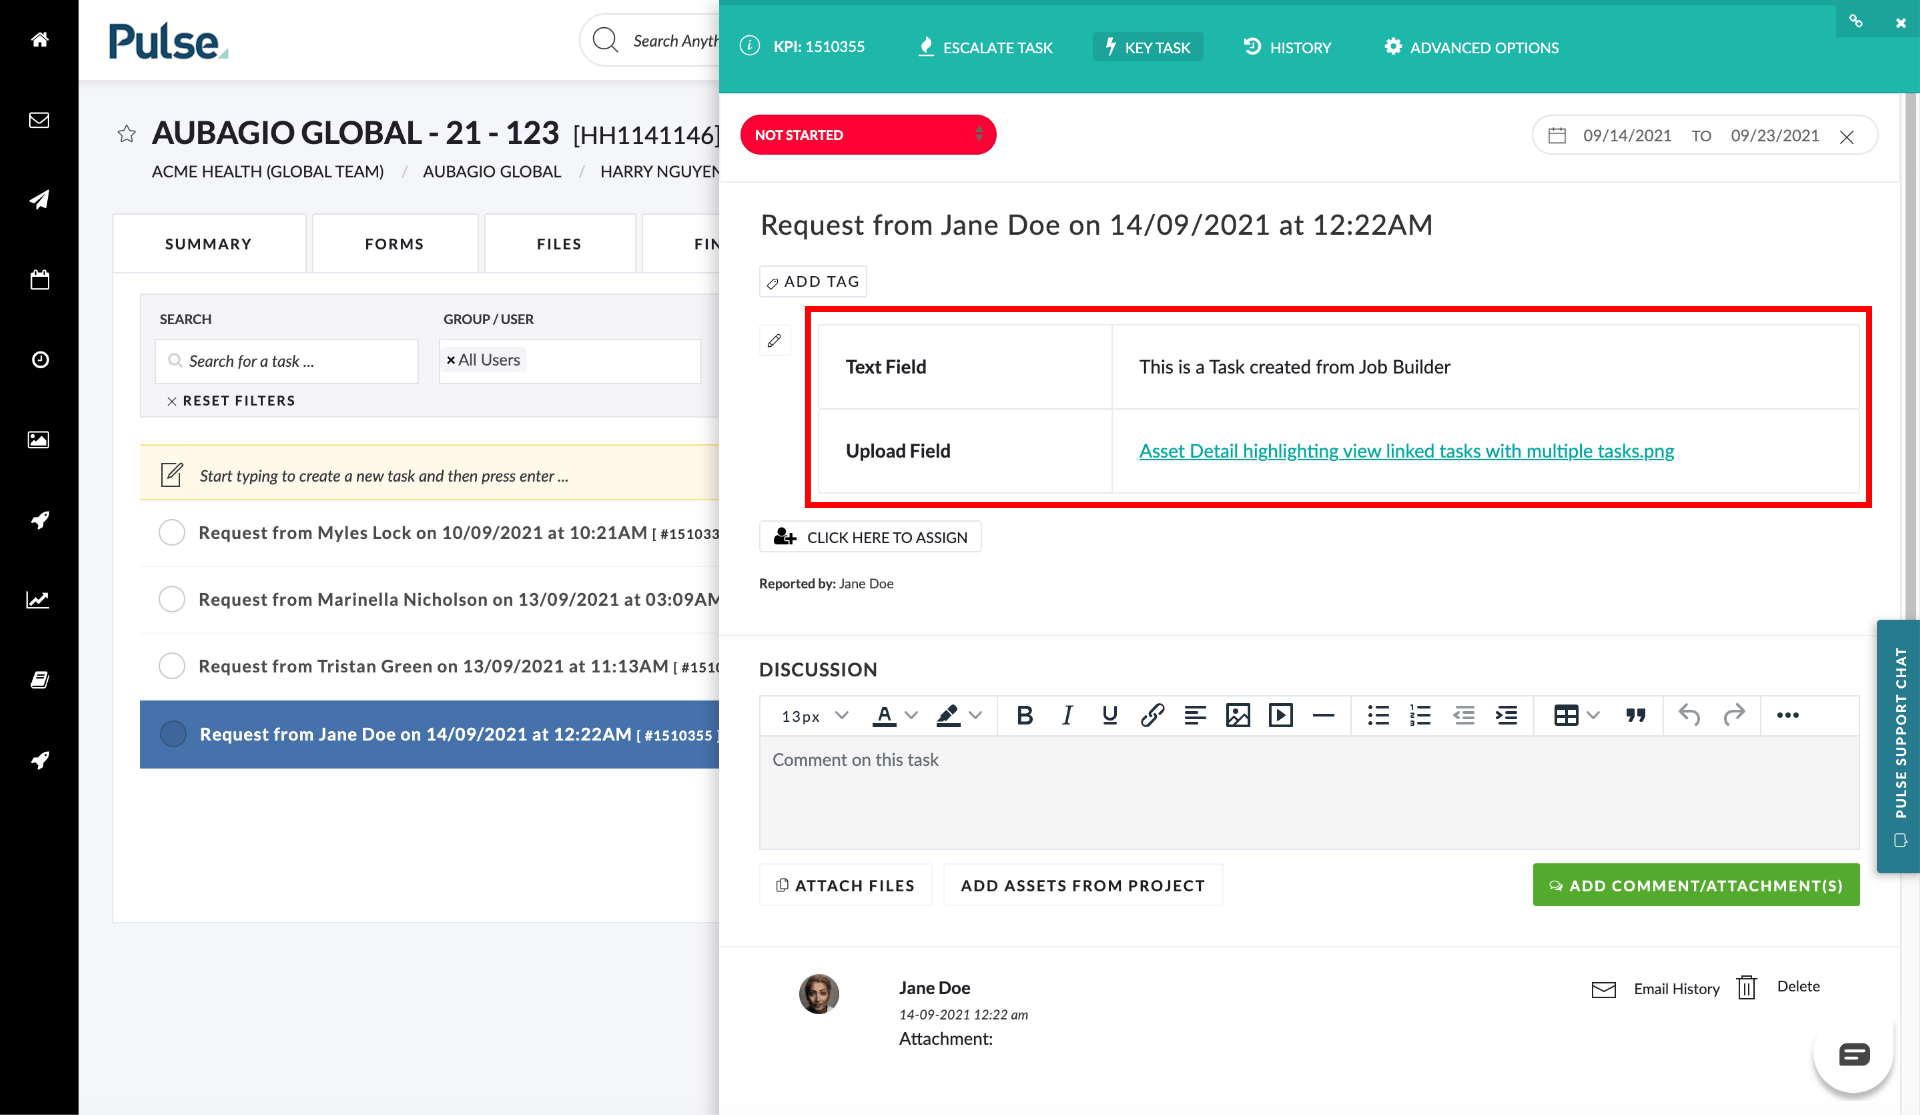
[#51060] Contents of Form Copied into Task ‘Description’
Over the course of the last few weeks, we have made improvements to the Forms & Job Builders. We are really excited about this small change that should have a large impact on the user experience using forms to create Tasks.
When you use a Job Builder that is configured to create Tasks on an existing or new Project, in addition to the PDF version of the Form being attached to the created task, the questions and answers from the Job Builder now automatically populate the task description of the created task.
This means you can construct customised Forms to ensure that your Tasks are created according to your preferred process, and contain all the required information and instructions for your workflow.
For example, this simplified Job builder Form is configured to add a task to an Existing Project, and requests a single Text field and Upload Field.

Clicking the “Submit and Go to Job” button will cause a Task to be created in the selected Job with the values of the fields copied into the Task Description of the created task.
More complex Job Builder forms copy all the information collected in the form into the description field. This means you could construct Job Builder forms to capture all sorts of formalised information required for different tasks such as:
- business specific task metadata (eg. Task owner, SME, Objectives, technical requirements)
- complex review workflows and instructions
- regulatory requirements, form uploads
- tightly specified production requirements
[#51094] Change the Actions > Version History to trigger the asset detail screen
We have a beautiful new Asset Detail pop-over, so we have deprecated the ‘Version History’ screen that was shown when clicking the “Version History” option in the “Action” drop-down.
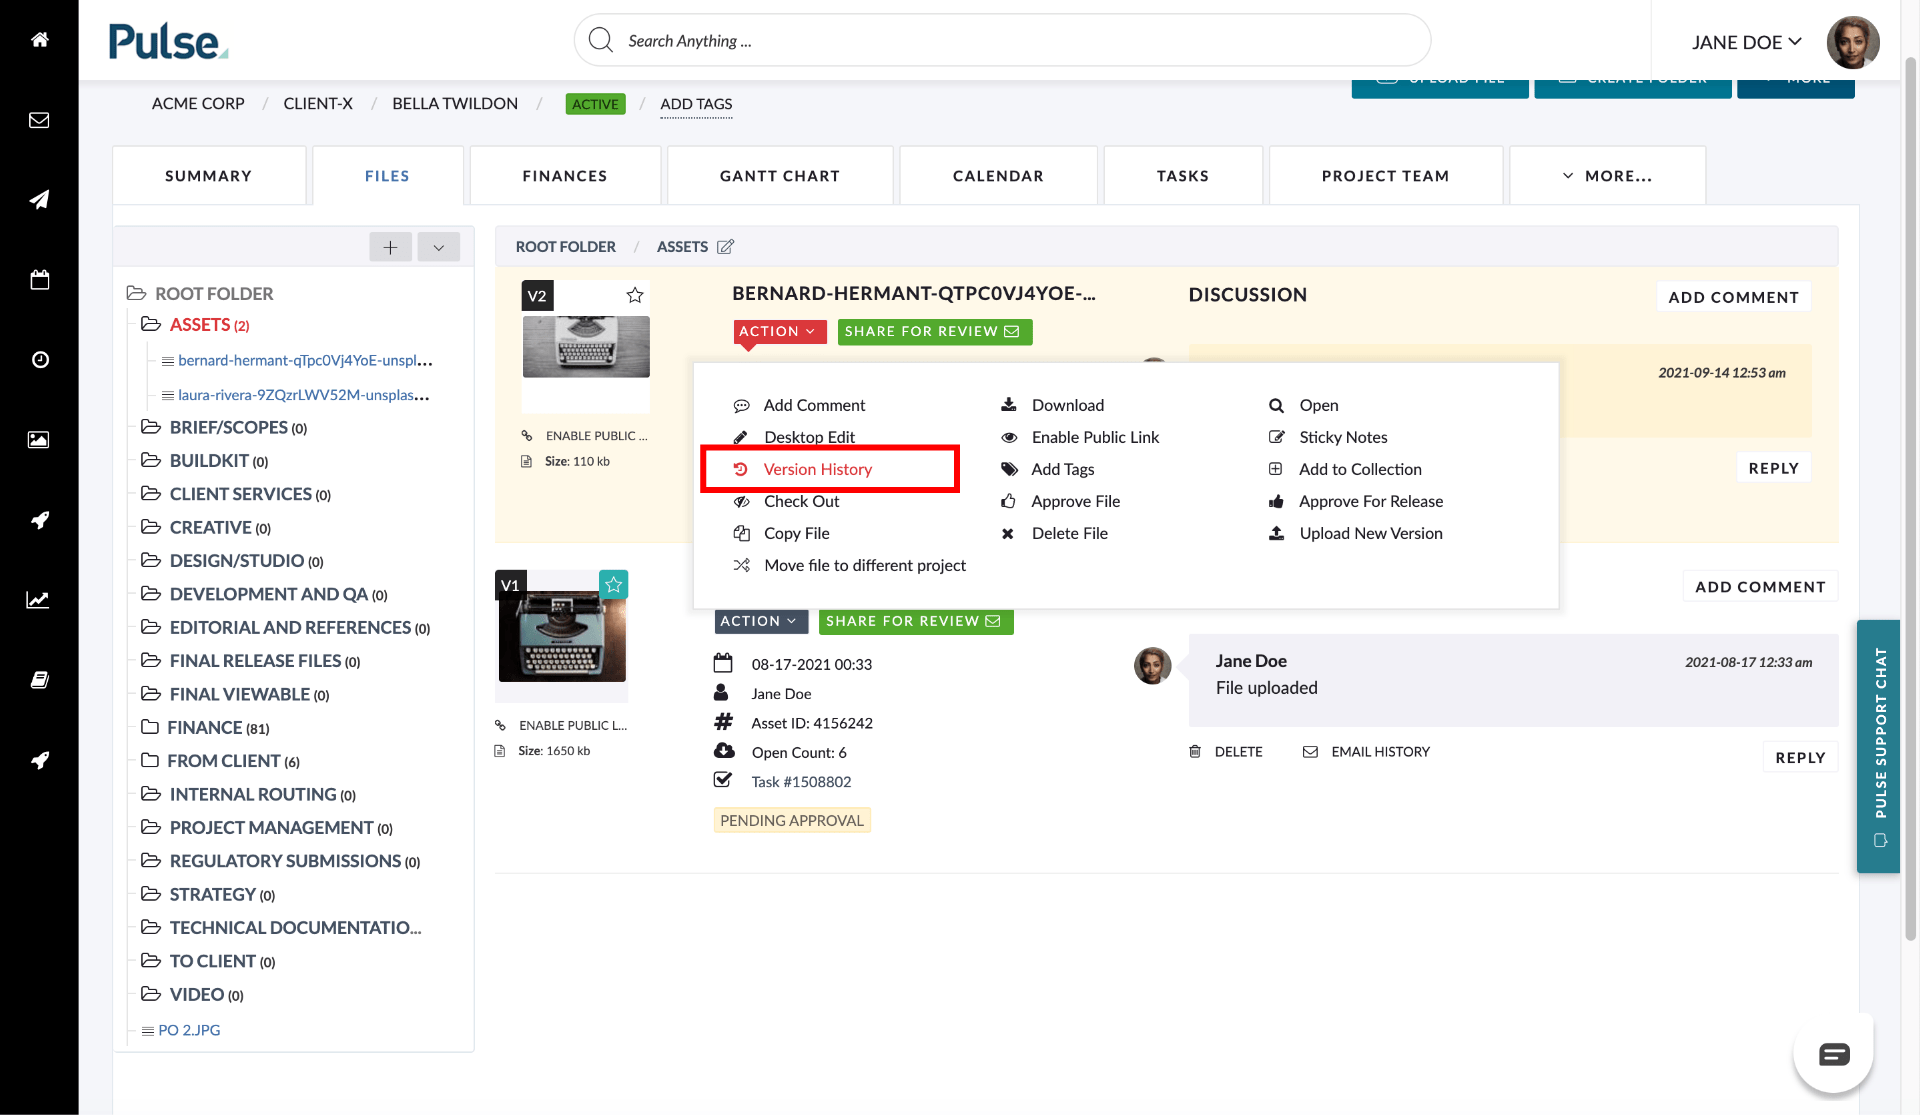
Clicking the “Version History” option in the “Action” drop-down will now open the Asset Detail screen directly on the “Versions” tab.
From this tab you can see:
- The current version’s comments are always displayed in the Asset pop-over Discussion section.
- Clicking on a thumbnail of a version of an Asset will download that version of the Asset
- Important meta-data, like file size and upload date, is listed against each version of the Asset.
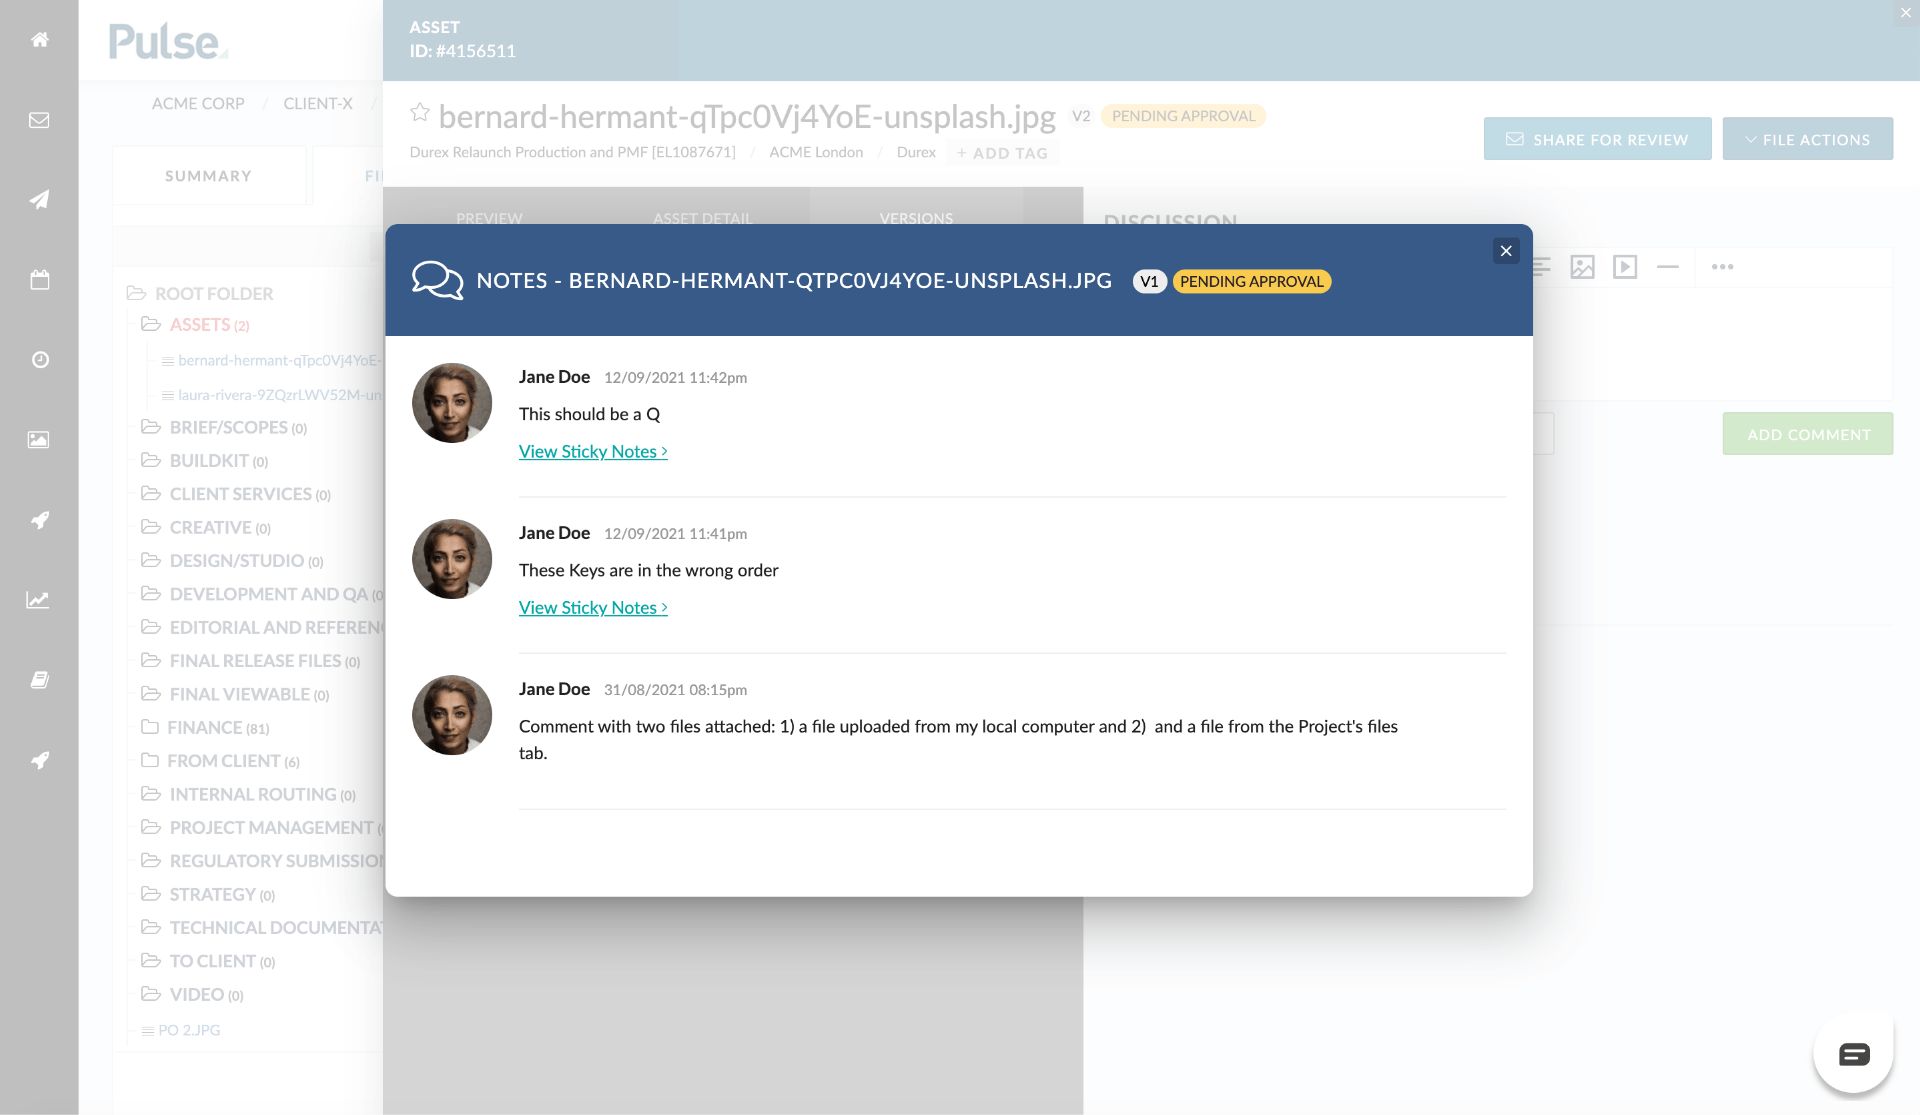
- Clicking the “Show Comments” button next to a particular version will open the comments that are attached to that version in a modal window.

Clicking the “Show Comments” button next to each version will open a modal to display all the comments made against the selected version.
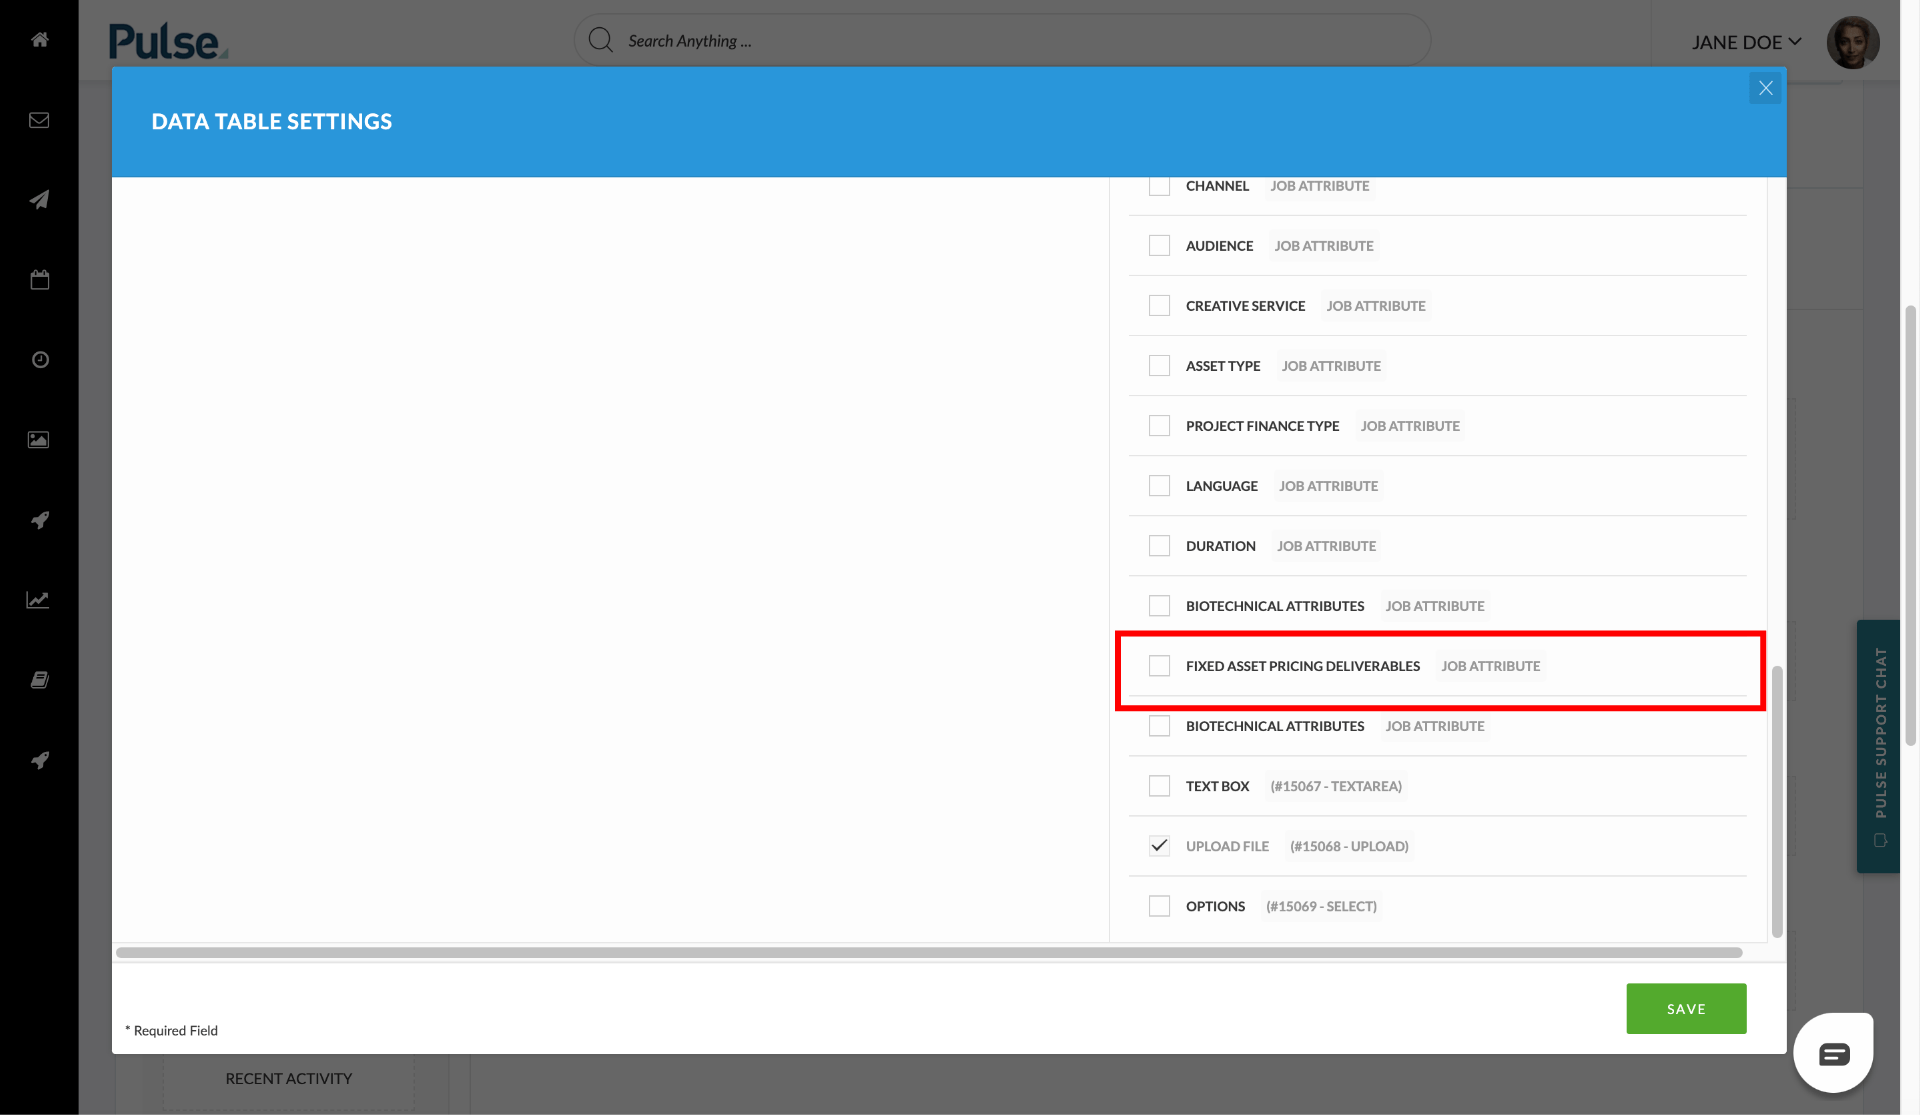
[#51362] Add the Agresso field of “Fixed Asset Pricing”- y/n – that is asked during project opening to the closeout KPI form data (per each project)
We have added the ‘Fixed Asset Pricing’ Agresso field as an exportable field in the Data Table Settings for the Portal Pages.
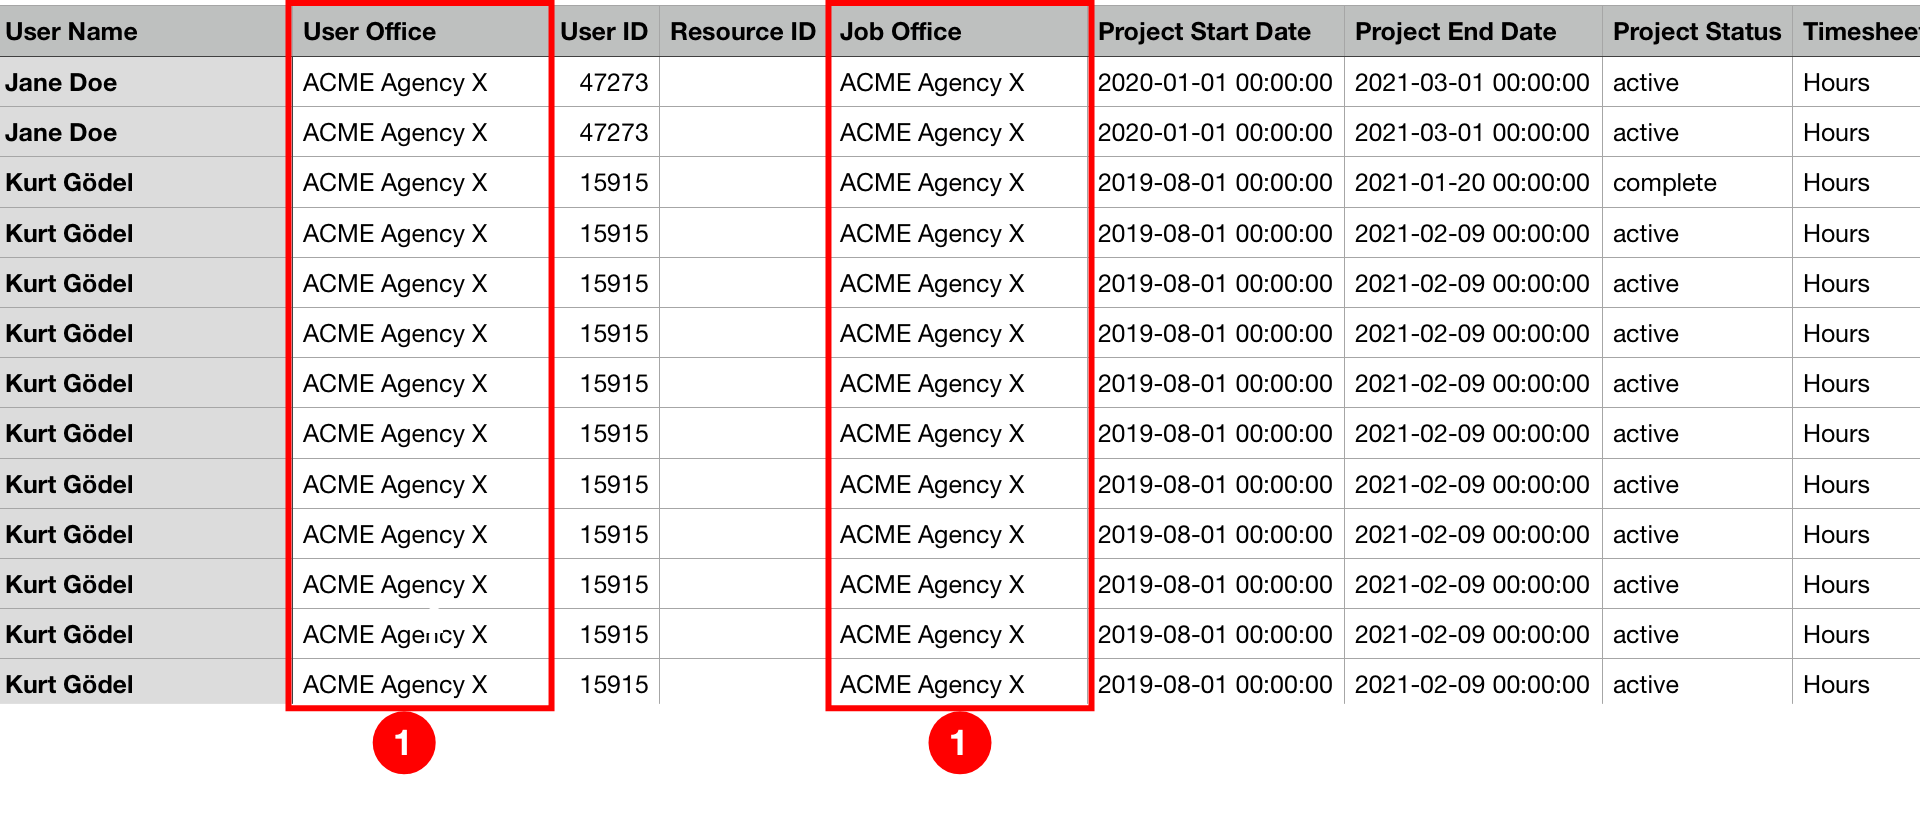
[#51404] Resource Data Export – Add 2 new columns
We have added two new fields of ‘Job Office’ and ‘Users Office’ to the current Resource Planner for the ‘Resource Data Export’ so users can use the Excel pivot tools to create reports.
FIXES
![]()
![]()
![]()
[#50601] Bug: Drag to Create in a Job Attribute doesn’t set Job Attribute [Pulse Planner]
Fix – In the Pulse Planner, if you clicked and dragged to create a Project whilst in a Pivot on Job Attributes – the ‘Create Planned Project’ form flyout did not set to the Job Attribute that you clicked on to initiate the form.
[#51547] Bug – Attributes get erased when you change the dates of the actual project
Fix – When you changed the dates of a Project (non-Agresso) from the Project Dashboard it inadvertently cleared the project attributes on the Project.
[#51940] Bug: Approved Time Appearing under ‘Pending Approval’ in General Time Approval Page
Fix Hours in the General Time Approval page, that had already been approved in the past were incorrectly labelled as ‘pending.’
[#51082] BUG: Dashboard widgets headers not taking user to the project
When the Asset Detail pop-over is triggered from a Dashboard widget such as Inbox, Recent Activity or Recent Uploads, the link to the Project that appears in the header did not work. It was directing users to a 404 error page. It now takes the user to the Project as intended.
[#51528] Edit Project settings: Brand list is incorrect
Fix – it was reported that the Brand dropdown under edit Project settings is wrong. Instead of showing the Brands that are mapped to the Office that the Project belongs to, it was showing the Brands that are mapped to the Office that the currently logged in User belongs to.
The list of available Brands now only show Brands mapped to the Office of the project.
FEATURES & ENHANCEMENTS
![]()
![]()
[#49831] Use Pulse PO’s instead of AGR ones > Update PDF
Since the Pulse PDF Financial Documents look so good, we have added the ability for users to use the Pulse Purchase orders instead of the Agresso Purchase Orders.
To enable, go to the Office Settings, click the “Advanced” tab and enable ‘Use Pulse Purchase Orders’.
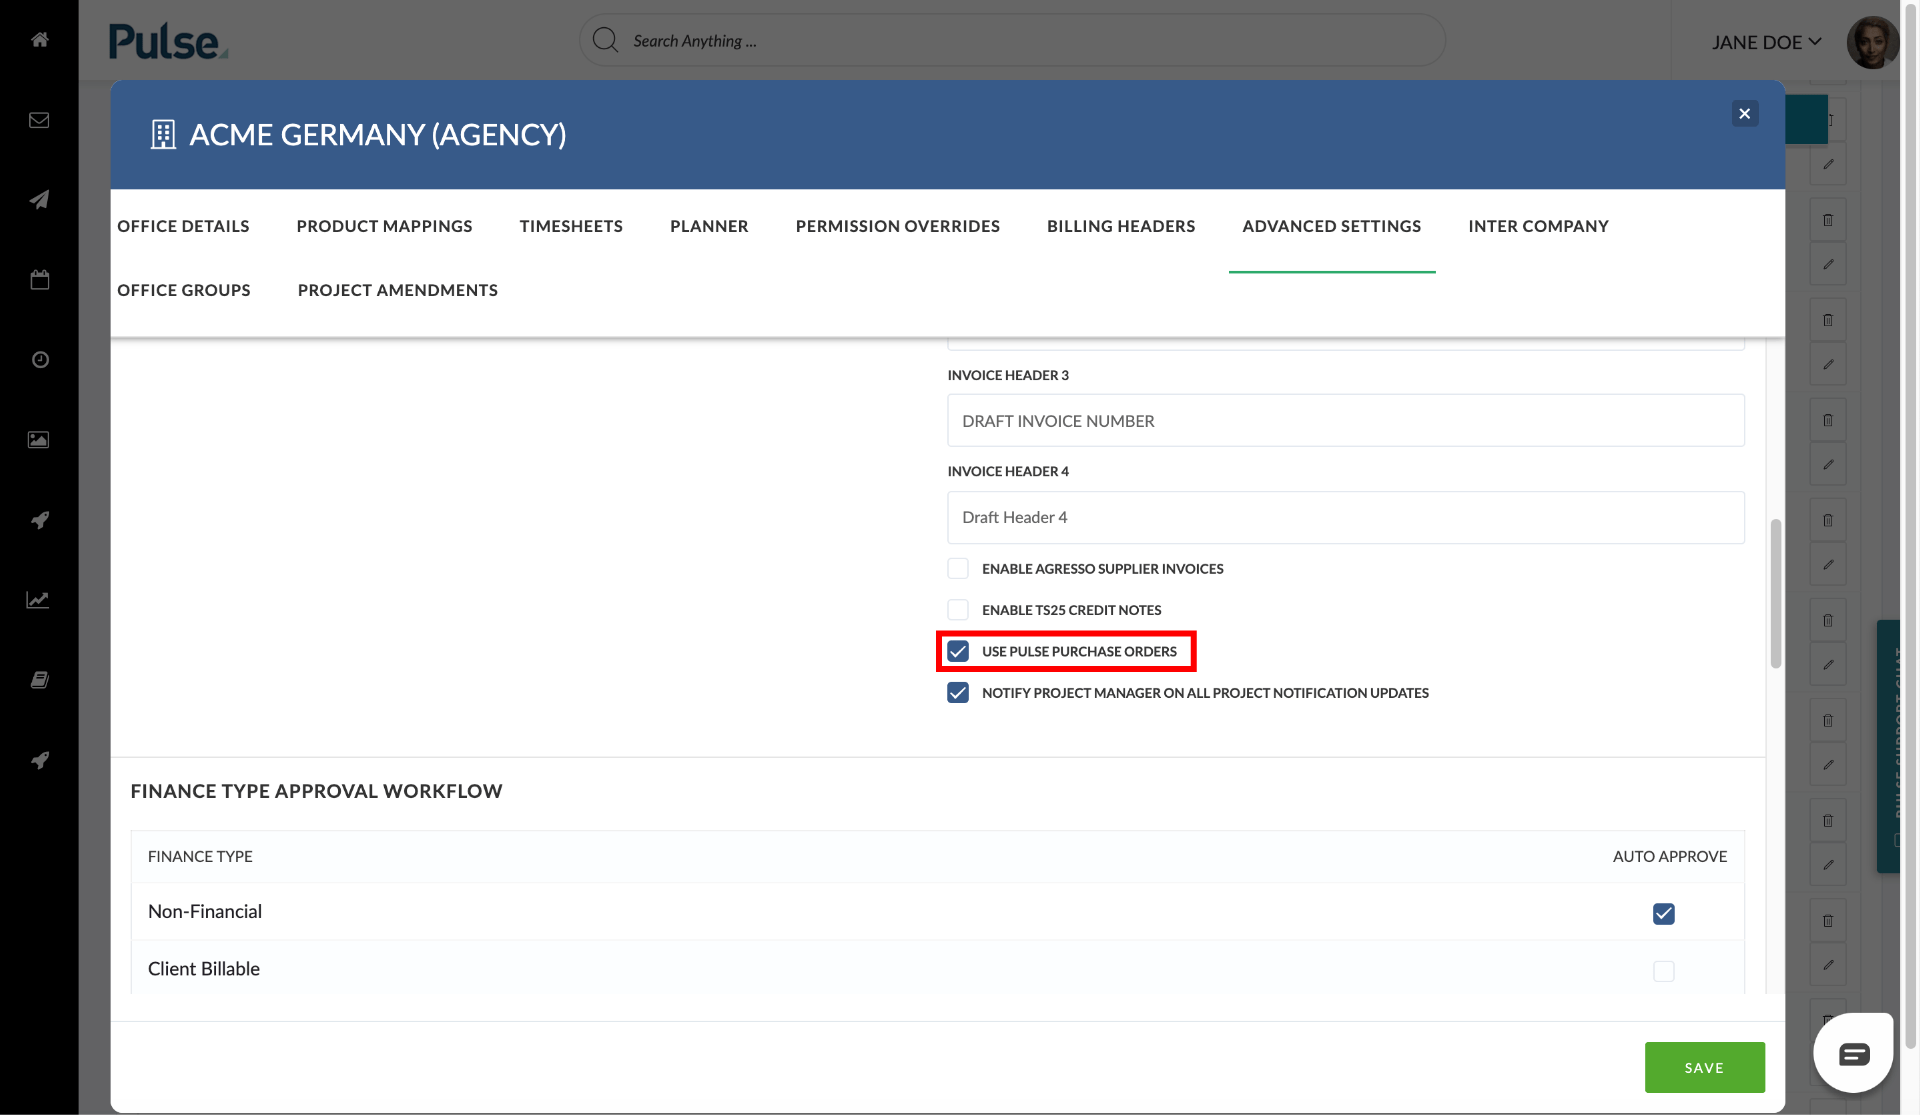
When the PO Number from Agresso is sent to Pulse we will add it to the Pulse PDF and the draft watermark is removed. The new PDF is saved as PO_{pulse-po-no}_{agr-po-no}.pdf in the Files > Finance > Approved Pos folder.
FIXES
![]()
![]()
[#51546] Project Wizard: Master Client, Brand, Product show duplicate records
Fix – Master Client, Brand and Product dropdowns on the Agresso step of the UK/EU Project Wizard were appearing multiple times when Product Defaults were set for that particular Brand.
We now ensure that each value is displayed only once Master Client, Brand and Product dropdowns in the Project Wizard.